JavaScript: Simple Demo (TryHackMe)
JavaScript: Simple Demo is a pre-security room by TryHackMe that allows beginners to learn the fundamentals of JavaScript, a programming language mostly used in the development of web applications, which security professionals commonly interact with JavaScript code while pentesting and reviewing web application codebase & scripts.
Introduction
The purpose of this room is to give you an idea about one popular programming language: JavaScript. It is almost certain that you have come across the name JavaScript; however, throughout this room, we assume that you have never studied or written programs in this language.
JavaScript is used in most of the web pages that you visit on a day-to-day basis. Consequently, when we think of JavaScript engines, web browsers come to mind. In fact, JavaScript was initially developed to run on client machines, in particular, within a web browser. However, this has changed with the release of Node.js, which enables developers to build web applications with JavaScript. Consequently, as Node.js spread, JavaScript was no longer just a client-side programming language but also a server-side one.
In this room, we will create a “Guess the Number” game. Our plan will be as follows:
The computer secretly picks a number between 1 and 20.
The user keeps guessing until they get it right.
The computer tells the user whether their guess is too low or too high.
An example session running the program is shown below.
Terminal
ubuntu@tryhackme:~/JavaScript-Demo$ node guess_v3.js
I'm thinking of a number between 1 and 20
Take a guess: 10
Too high, try again.
Take a guess: 5
Too low, try again.
Take a guess: 7
You got it in 3 tries!
We will try to follow an approach similar to the one we followed in the Python: Simple Demo room. Hence, we chose the same idea to implement. The reason for this is to allow you to explore the main language differences for the same program idea.
Learning Objectives
Learn about JavaScript variables
Understand how conditional statements are used
See iteration (loop) in action
Prerequisites
Variables
You can follow along by starting the attached VM by clicking the Start Machine button shown above. Visual Studio Code should open automatically as shown in the screenshot below.
Setting the Stage
Before starting, we should point out that JavaScript files can be executed in various ways; one way is to use your web browser, and another way is to use Node.js. However, for our purposes, the easiest way to get started is by using Node.js. It is easy to download for your system and run your JavaScript files from the command line.
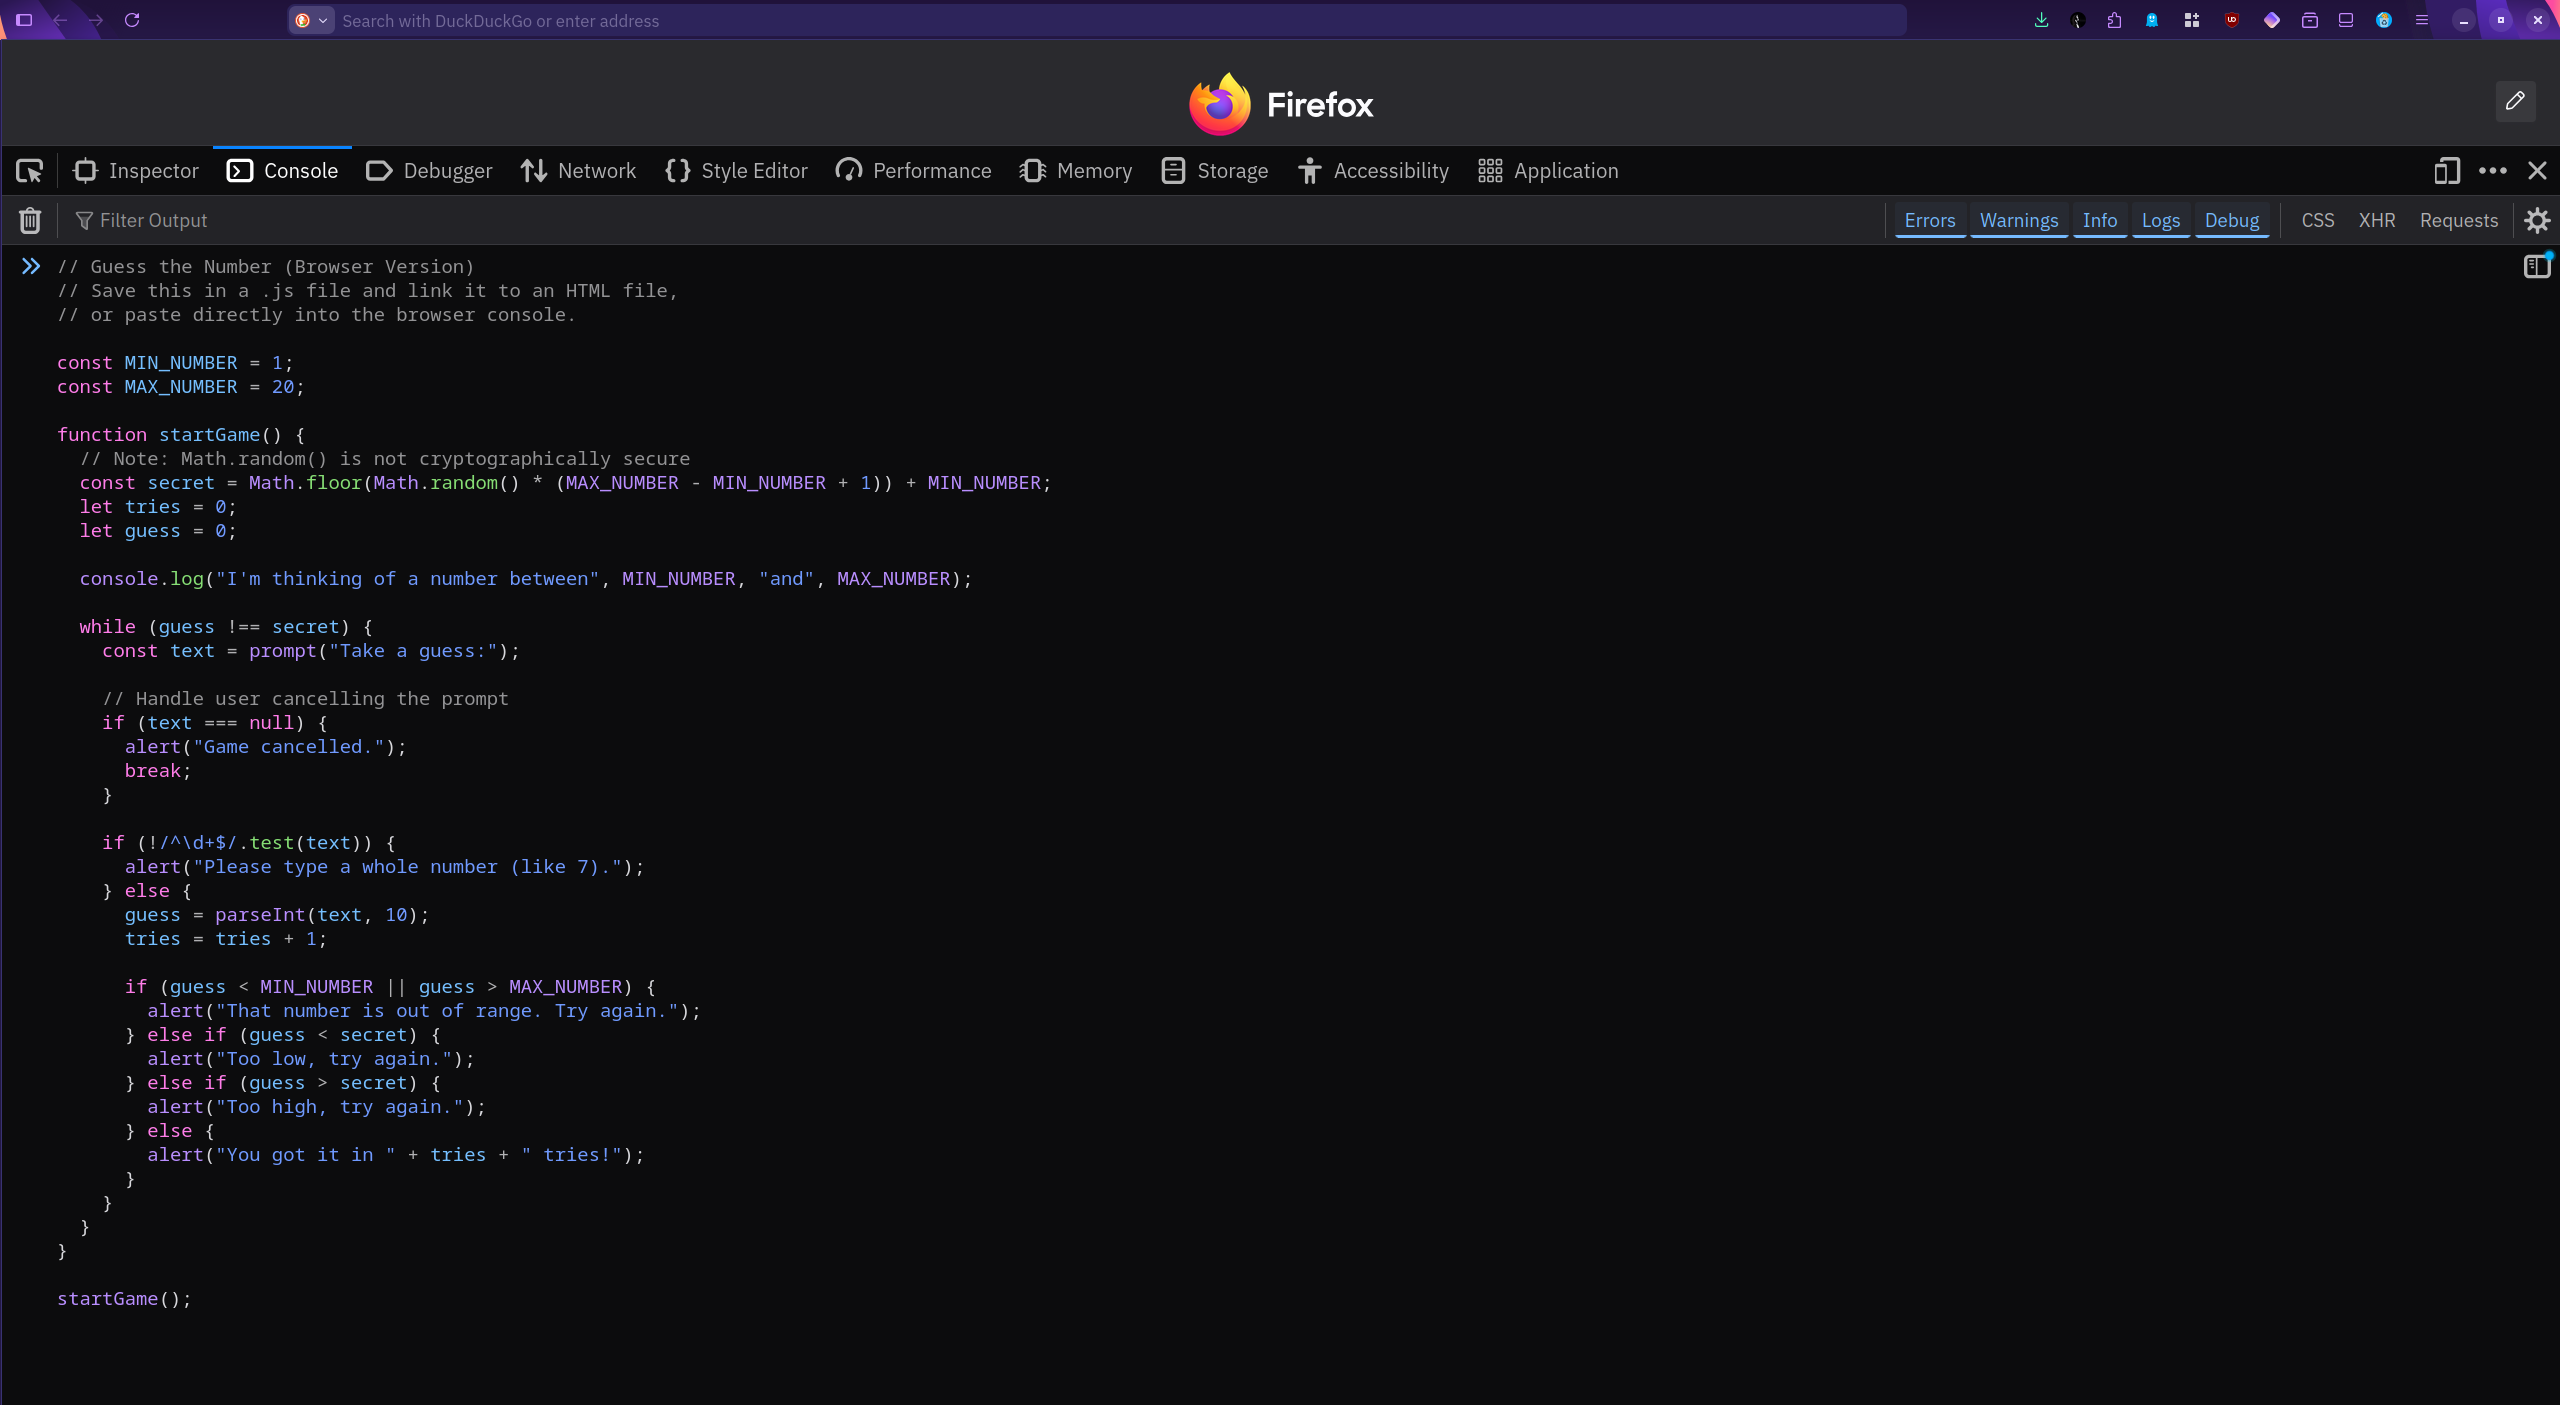
If you are curious about running JavaScript in your web browser, it is pretty simple. In your favorite web browser, access the Web Developer Tools. For example, I need to press F12 in Firefox to open the console, where I can run my JavaScript code. A screenshot of a web browser running JavaScript code is shown below.
Note that in this room, we will test our JavaScript code exclusively using Node.js. This process can be run by typing node demo.js at the command line, where demo.js is the name of our JavaScript file.
Creating Variables
Going back to our “game”, we need to start by declaring variables. We think of a variable as a space in memory that stores a value and allows us to change this value later. For example, we want to keep track of the number of tries (attempts) a user has made, as well as the user’s guess. We can do this by declaring these two variables:
let tries = 0;
let guess = 0;
The let indicates that we are declaring variables. When the user starts, they have not made any attempts, so tries is set to 0; moreover, we initialize guess to a value that cannot accidentally be the secret number that the user is trying to guess. (On a side note secret is constant and will be covered in the next subsection.) Remember that the secret number is between 1 and 20.
Creating Constants
We use let to declare variables, whose value can change throughout the program; however, we use const to declare constants, whose value cannot change throughout the program.
The secret holds the number that we will try to find by guessing, and it should not change. As already mentioned, to declare a constant, we use the keyword const, for example, const secret = 12. To ensure that secret gets a new random value each time we run the program, we need to use JavaScript’s Math.random() method.
const secret = Math.floor(Math.random() * (20)) + 1;
Although the details of this expression are not the key purpose of this room, we will share a brief breakdown for the curious readers.
Math.random()gives a random decimal between 0 (inclusive) and 1 (not including 1). Example:0.372.* 20stretches that range from 0 to (almost) 20. Example:7.44.Math.floor()removes the decimal by rounding down. Example:7.44becomes7.+ 1shifts the range from0–19to1–20.
As a result, secret ends up being 1, 2, 3, …, up to 20.
Displaying Output
Once the secret number is picked, the program should inform the user that this step is complete. To display on the screen, console.log() can be used. In the example expression below, the string included between the double quotes will be displayed on screen.
console.log("I'm thinking of a number between 1 and 20");
Answer the questions below
What word is used to declare a variable?
letWhat word is used to declare a constant?
constWhat is the method that we call to display text on the screen?
console.log()
Prompting the User for Input
Before starting, please note that you can download the attached zip file. It includes all versions of the program that are present on the target VM. This archive allows you to review the project's evolution, compare implementations, or test each version independently on your local machine. Having all iterations in one package should make your work more efficient.
In the previous task, we set our variables and constants; moreover, we picked a random secret number for the user to guess. Now, we need to prompt the user to take a guess and enter a number. In the first line, we wait for the user to input a value and save it in text. In the second line, we parse the text as an integer of base 10 using parseInt(text, 10). The parseInt() method takes the user input and converts it from text into an integer value.
const text = await rl.question("Take a guess: ");
guess = parseInt(text, 10);
Optional Notes
The await instruction pauses the system until the user responds. Obviously, Node.js’s default behavior is not to wait for a user to enter a value. Remember that Node.js is built as a runtime environment for web applications, not to run such a command-line JavaScript program. Consequently, we need to use libraries to override the default behavior and force Node.js to wait for the user. The following lines achieve this:
import * as readline from "node:readline/promises";
import { stdin as input, stdout as output } from "node:process";

const rl = readline.createInterface({ input, output });
The first line borrows (import) the readline module so that the program can ask questions and wait for typed answers. The /promises part means it can “pause” neatly until the user responds. The second line imports two more modules, stdin, short for standard input (usually the keyboard), and stdout, short for standard output (usually the screen); moreover, it renames them to input and output respectively. The third line sets up the conversation channel using the “microphone” from line 1 and the “wires” from line 2.
Why is this so complicated to get command-line input? Because we are using Node.js to test our JavaScript program, we do not need to keep the server busy waiting for user input. Deviating from the expected default requires us to add these extra library imports.
Clean Execution
To read user input, we had to create an interface we likened to a microphone. Before the program finishes, we need to close this interface. You would also switch off your microphone after the Q&A session. To close the interface, we use rl.close(). As a result, our code will declare and initialize the rl (short for readline), use it to get text input from the user, and close() it. These three steps are shown below.
const rl = readline.createInterface({ input, output });

try {
//...
    const text = await rl.question("Take a guess: "); // rl.question() returns text (a string)
//...
} finally {
    rl.close();
}
The try block creates a safe environment so that if something goes wrong, the program won’t crash. Think of it as trying to run a set of statements, and if something happens, handle it gracefully, and finally clean up.
Let’s summarize what we are doing:
We are importing the
readlinemodule with the/promisespart, indicating that the script will handle waiting without freezing everythingThen we imported
stdout(standard output) andstdin(standard input) asinputandoutputUsing these imported modules, we create the readline
constwith the namerl.The program makes its guess using
Math.random()and saves that assecret, a constant.We declared two variables,
triesandguessWe displayed on the screen that “a number between 1 and 20” has been selected
The user’s response is considered a guess and will be saved in
text, a constantThe user’s response is converted to a number using
parseInt()The number of
triesincreases by oneFinally, we clean up and close the readline interface,
rl, that we created earlier
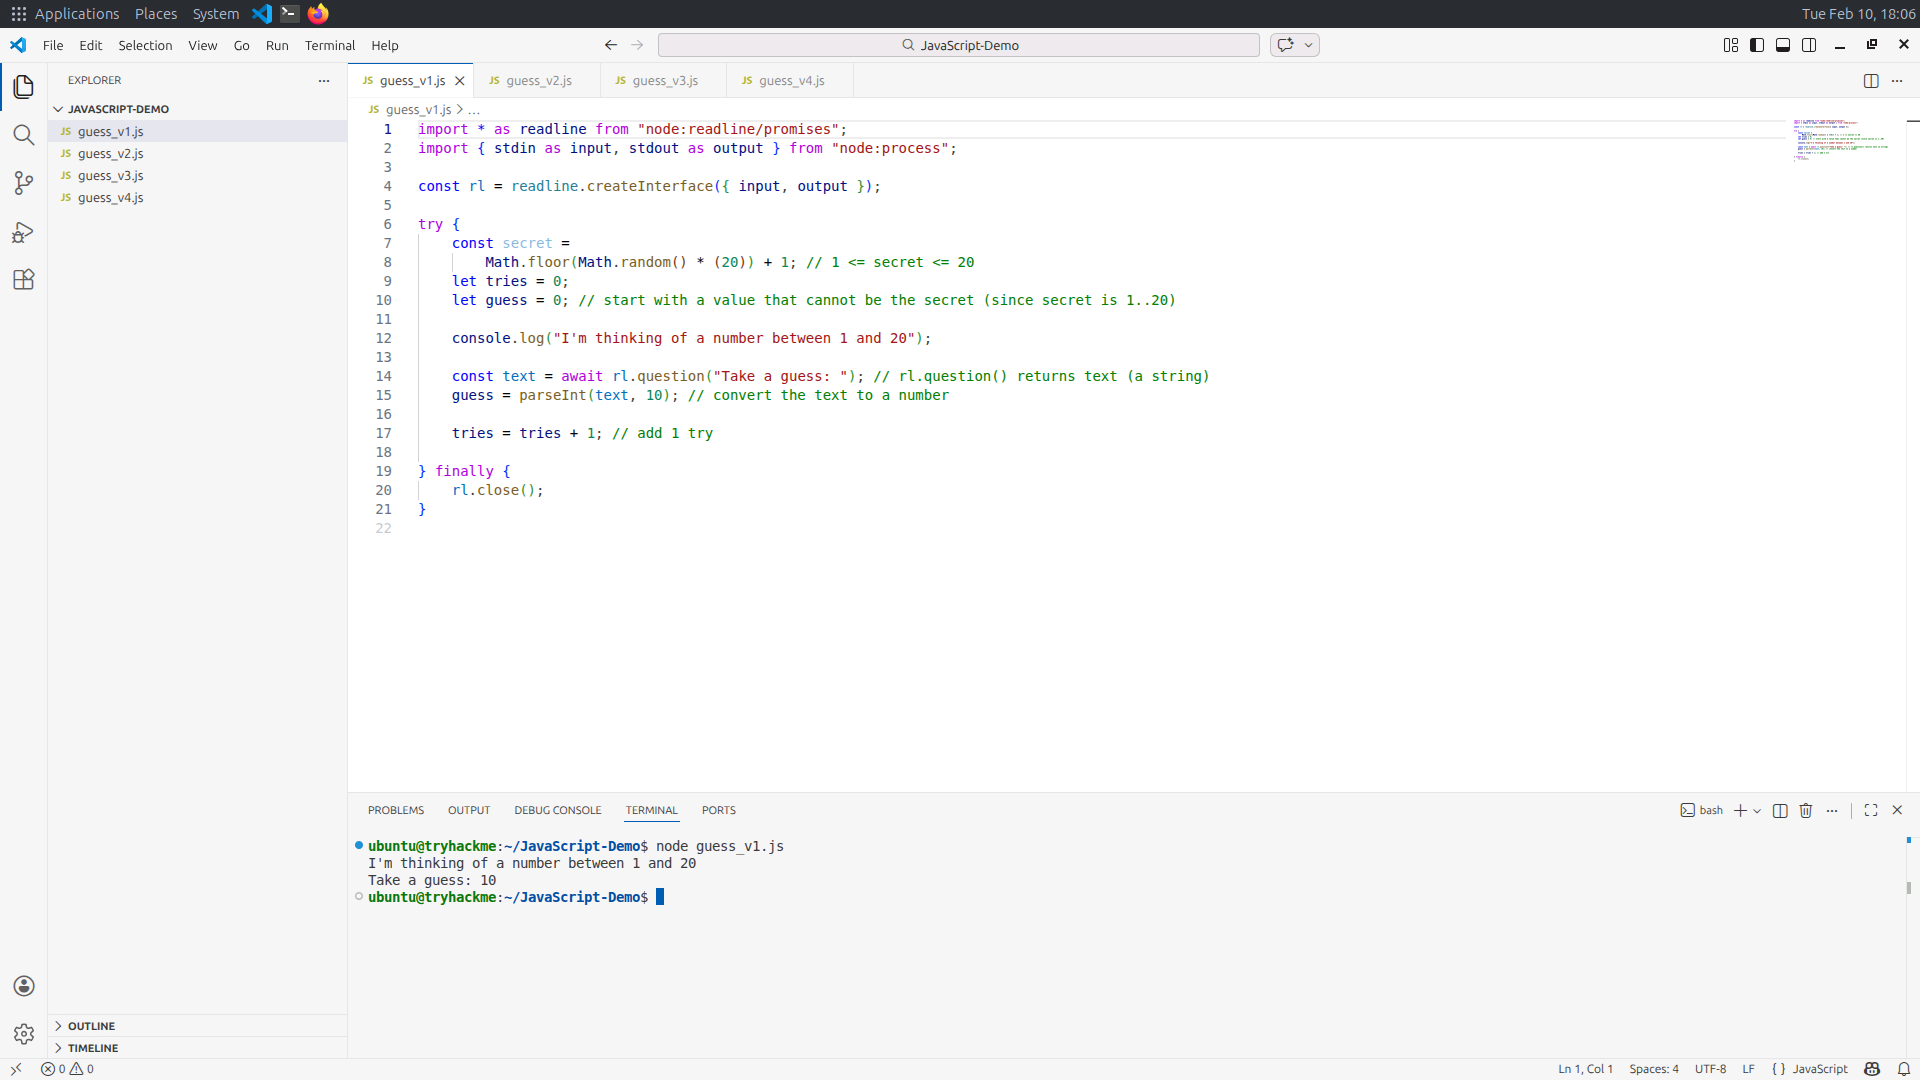
Putting it All Together
The first draft we have built so far is listed below and is also available on the system as guess_v1.js, which can be found in the /home/ubuntu/JavaScript-Demo directory.
import * as readline from "node:readline/promises";
import { stdin as input, stdout as output } from "node:process";

const rl = readline.createInterface({ input, output });

try {
    const secret = Math.floor(Math.random() * (20)) + 1; // 1 <= secret <= 20
    let tries = 0;
    let guess = 0; // start with a value that cannot be the secret (since secret is 1..20)

    console.log("I'm thinking of a number between 1 and 20");

    const text = await rl.question("Take a guess: "); // rl.question() returns text (a string)
    guess = parseInt(text, 10); // convert the text to a number

    tries = tries + 1; // add 1 try

} finally {
    rl.close();
}
What’s Missing?
The most glaring missing component is that the user receives no feedback, even if they get the correct answer. Let’s get this implemented in the next task.
Answer the questions below
What method is used to convert user input into a number?

Conditional Statements
So far, you are playing the “guess the number” game, and the current program has no way to provide feedback on your choices. It asks you to make a guess, and it goes silent! Let’s make things more engaging and advance our program so it can evaluate user input and provide feedback.
We will follow the following logic steps:
If it is outside the valid range, i.e., not between 1 and 20, we tell the user that their “number is out of range”
If it is less than the
secretnumber, we inform the user that it is “too low”If it is greater than
secret, we inform the user that it is “too high”If it is not greater than and not less than the
secretnumber, this means that it is equal to thesecretnumber, and the user has successfully guessed it
From the above comparisons, you can see that if the first condition holds, there is no point in checking the second condition. Moreover, if the second condition holds and it is less than secret, there is no point in checking the third condition. Because the conditions are mutually exclusive, we can make use of else. We will present the conditions using JavaScript and discuss them afterwards.
// Give a hint using if / else if / else.
if (guess < 1 || guess > 20) {
    console.log("That number is out of range. Try again.");
} else if (guess < secret) {
    console.log("Too low, try again.");
} else if (guess > secret) {
    console.log("Too high, try again.");
} else {
    console.log("You got it in", tries, "tries!");
}
The above if, else if, and else statements will execute as follows:
if (guess < 1 || guess > 20): If the guess is less than 1 or the guess is greater than 20, then useconsole.log()to tell the user that the “number is out of range”. Note that||represents "or" in JavaScript.else if (guess < secret): Theelsemeans that if the previous condition is not true, run this statement.if (guess < secret)will evaluate whether the guess is less than the secret. If this is the case, it will useconsole.log()to display “too low” on the screenelse if (guess > secret): Similarly, theelsewill ensure that this statement won’t run unless the previousifhas evaluated tofalse. Assuming that the lastifcondition evaluated to false,if (guess > secret)will assess its condition. In the case thatguessis greater thansecret, theconsole.log()displays “too high”Finally, we see an
elsesitting by itself. Thiselsemeans that if all previousifconditions are evaluated to false, the enclosed statement will execute. As we established earlier, if all previous conditions are evaluated to false, it means that the user guessed the number.
Putting it All Together
Our draft can be updated to include the conditions we covered in this task. The previous draft will be expanded to provide the user with feedback on their guesses. The updated program we have constructed so far is listed below and is also available on the system as guess_v2.js in the /home/ubuntu/JavaScript-Demo directory.
import * as readline from "node:readline/promises";
import { stdin as input, stdout as output } from "node:process";

const rl = readline.createInterface({ input, output });

try {
    const secret =
        Math.floor(Math.random() * (20)) + 1; // 1 <= secret <= 20
    let tries = 0;
    let guess = 0; // start with a value that cannot be the secret (since secret is 1..20)

    console.log("I'm thinking of a number between 1 and 20");

    const text = await rl.question("Take a guess: "); // rl.question() returns text (a string)
    guess = parseInt(text, 10); // convert the text to a number

    tries = tries + 1; // add 1 try

    // Give a hint using if / else if / else.
    if (guess < 1 || guess > 20) {
        console.log("That number is out of range. Try again.");
    } else if (guess < secret) {
        console.log("Too low, try again.");
    } else if (guess > secret) {
        console.log("Too high, try again.");
    } else {
        console.log("You got it in", tries, "tries!");
    }
} finally {
    rl.close();
}
Let’s quickly review what this code does:
It picks a random
secretnumber between 1 and 20It keeps track of the user’s
guessand number oftriesThen it asks the user to “Take a guess:”
The user’s guess is received as
textand converted to a number, and saved inguessWe compare
guesswithsecretand give feedback to the user about their attempt
Make sure that you have a good understanding of the script so far. You are not expected to write it yourself; however, you should be able to explain it by looking at it.
What’s Missing?
This code runs once, giving the user a single chance. This situation is shown in the interaction below.
Terminal
ubuntu@tryhackme:~/JavaScript-Demo$ node guess_v2.js
I'm thinking of a number between 1 and 20
Take a guess: 10
Too low, try again.
Obviously, that’s not a fun game if the user gets only one chance. We need to give the user more chances until they make the correct guess. In the next task, we will get our script to provide the user with many chances to make the game more fun.
Answer the questions below
The
secretis10. What will our program display on the screen if the user makes aguessof 15?
The
secretis10. What will our program display on the screen if the user makes aguessof 35?
Iterations
The script we have so far efficiently provides feedback on the user’s guess; however, it does not give them a second chance. In this task, we will make the necessary changes so that it keeps prompting the user for new guesses until they figure it out.
One way to achieve this is to keep prompting the user to make new guesses as long as their guess is wrong, i.e., while their guess is not equal to secret. That’s quite easy to express in JavaScript: while (guess !== secret). The !== means “not equal”. This is called a while loop and is written as shown below:
// Repeat until the user guesses the secret number.
while (guess !== secret) {
    // Loop body: instructions to be repeated
}
The next part to decide is what to include in the body of this while loop. Based on the program logic we have built so far, we should repeat the following:
Prompt the user to take a guess
Convert the user’s input to a number and save it in
guessIncrease the number of
triesby oneCheck
guesswith respect to the lower and upper limitsIf it is within the limits, compare it to the
secretnumberDisplay feedback to the user about their choice
And we will repeat if the users didn’t make the correct guess.
The JavaScript code with the while loop filled is shown below.
// Repeat until the user guesses the secret number.
while (guess !== secret) {
    const text = await rl.question("Take a guess: "); // rl.question() returns text (a string)
    guess = parseInt(text, 10); // convert the text to a number

    tries = tries + 1; // add 1 try

    // Give a hint using if / else if / else.
    if (guess < 1 || guess > 20) {
        console.log("That number is out of range. Try again.");
    } else if (guess < secret) {
        console.log("Too low, try again.");
    } else if (guess > secret) {
        console.log("Too high, try again.");
    } else {
        console.log("You got it in", tries, "tries!");
    }
}
Putting it All Together
The program we have constructed so far is listed below and is also available on the system as guess_v3.js.
import * as readline from "node:readline/promises";
import { stdin as input, stdout as output } from "node:process";

const rl = readline.createInterface({ input, output });

try {
    const secret =
        Math.floor(Math.random() * (20)) + 1; // 1 <= secret <= 20
    let tries = 0;
    let guess = 0; // start with a value that cannot be the secret (since secret is 1..20)

    console.log("I'm thinking of a number between 1 and 20");

    // Repeat until the user guesses the secret number.
    while (guess !== secret) {
        const text = await rl.question("Take a guess: "); // rl.question() returns text (a string)
        guess = parseInt(text, 10); // convert the text to a number

        tries = tries + 1; // add 1 try

        // Give a hint using if / else if / else.
        if (guess < 1 || guess > 20) {
            console.log("That number is out of range. Try again.");
        } else if (guess < secret) {
            console.log("Too low, try again.");
        } else if (guess > secret) {
            console.log("Too high, try again.");
        } else {
            console.log("You got it in", tries, "tries!");
        }
    }
} finally {
    rl.close();
}
You can test it on the system by running node guess_v3.js; it can be found in /home/ubuntu/JavaScript-Demo. Every time you rerun the program, it should pick a new secret number for you to guess.
Terminal
ubuntu@tryhackme:~/JavaScript-Demo$ node guess_v3.js
I'm thinking of a number between 1 and 20
Take a guess: 10
Too low, try again.
Take a guess: 15
Too high, try again.
Take a guess: 13
Too low, try again.
Take a guess: 14
You got it in 4 tries!
It should be noted that the file node guess_v4.js, on the VM and in the zip file attached to Task 3, further improves this program. You are encouraged to take a look; however, it is not critical for this introductory room.
Answer the questions below
What is the name of the loop that we used in this task?

What is the name of the variable that is incremented by one when the user makes a new wrong guess?
How is “not equal” written in JavaScript?
Conclusion
In this room, we covered three key pillars in imperative programming languages:
Variables
Conditionals with
ifandelseLoops with
while
If this is your first exposure to JavaScript, don’t worry about being able to write a similar program yourself. Learning a programming language requires practice, and although you can now understand and explain this program, practice is indispensable to write something similar. We strongly encourage you to compare the code in this room with that of the Python: Simple Demo room; this will give you a good perspective on how different modern programming languages are designed and written.
In the next room, Database SQL Basics, we will explore SQL. Although SQL is not a programming language, it is commonly used to query relational database systems. For now, think of a relational database as a large set of related tables.