Agent Foundations (TryHackMe)
Introduction
If you have explored AI applications, AI security, or modern automation workflows, you have probably encountered the word agent. It appears everywhere: research agents, coding agents, SOC agents, browser agents, pentesting agents, customer support agents, and autonomous AI assistants.
However, the term is often used loosely. An “agent” may refer to a simple LLM prompt wrapped in an application, a deterministic workflow controlled by code, or a system that can reason, use tools, maintain state, and decide what to do next. Without clear foundations, it can be difficult to understand what an agent actually is, when one is needed, and which approach is appropriate for building it.
This room is designed to remove that confusion.
Before building the complete Atlas Research Agent in the next room, you will work through small, controlled Python examples that introduce the core building blocks of agentic systems. You will begin with a basic LLM workflow, then explore LangChain tool calling, structured outputs, LangGraph state and branching, framework selection, and common debugging failures.
The goal is not to cover every feature of LangChain or LangGraph. Instead, this room focuses on practical engineering judgement: recognising when plain Python is sufficient, when LangChain provides useful abstractions, and when LangGraph is better suited to stateful or branching workflows.
By the end of the room, you should be able to examine an AI-powered workflow and answer a simple but important question:
Does this actually need to be an agent?
Learning Objectives
Explain what an AI agent is and when one is needed
Compare plain Python, LangChain, and LangGraph workflows
Build a basic Python LLM workflow
Create a simple LangChain tool-calling workflow
Use structured outputs to make responses easier to validate
Build a basic LangGraph workflow with state and branching
Choose the simplest workflow that safely solves the task
Debug common agent failures such as invalid tool inputs, missing state updates, and wrong routing decisions
Prerequisites
Before starting this room, you should be comfortable with basic Python concepts such as variables, functions, conditionals, loops, files, and imports. If these topics are unfamiliar, complete the Python Basics room first.
Basic familiarity with LLM concepts, including prompts, responses, context, model outputs, and prompt structure, is also recommended. If you need a refresher, the Prompt Engineering room introduces LLM fundamentals, prompt behaviour, and effective prompt design.
Understanding AI Agents and Framework Choices
A common mistake in AI engineering is calling every LLM-powered system an agent.
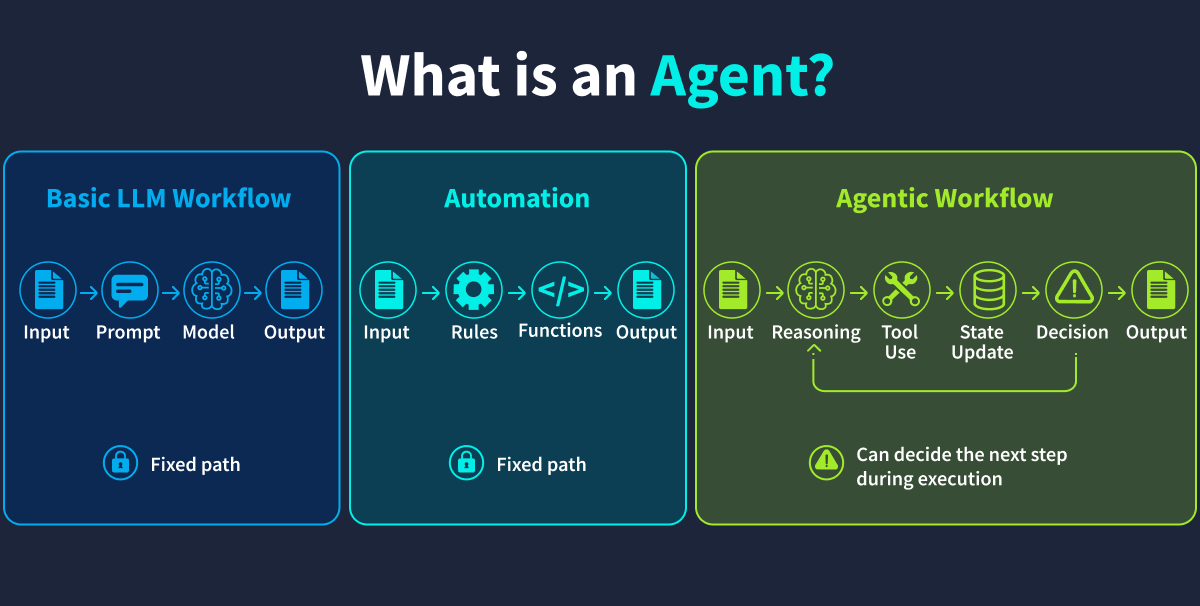
In practice, not every system that uses an LLM needs agentic behaviour. Some workflows only need a prompt, a model, and an output. Others need deterministic code that follows fixed rules. A smaller set of workflows needs the system to make decisions during execution, use tools, track state, and choose what should happen next.
This room separates three ideas that are often confused:
| Workflow type | Description |
|---|---|
| Basic LLM workflow | A fixed path from input to prompt, model, and output |
| Automation | A predictable workflow controlled by code, rules, or functions |
| Agentic workflow | A workflow where the system can choose tools, update state, and decide the next step |
The key difference is runtime decision-making. A basic LLM workflow follows a fixed path, and although an automated workflow may call functions, its sequence is usually predefined. An agentic workflow introduces greater flexibility by deciding whether a request requires a tool, which tool to use, whether additional information is needed, or which branch should run next. This flexibility can be useful, but it also increases complexity: the more freedom a system has, the harder it becomes to test, debug, evaluate, and secure.
Agentic workflows become more useful when the system must reason over information that is not already available in the prompt. In security, this often means connecting to approved data sources such as endpoint telemetry, identity logs, network events, vulnerability records, previous investigation notes, or ticket history.
Without these connections, the model may produce a plausible answer from incomplete context. Controlled tools allow the workflow to retrieve relevant evidence before deciding what should happen next.
This leads to a simple engineering principle for the room:
Use the simplest workflow that safely solves the problem.
What Is LangChain?
LangChain(opens in new tab) is a framework for building LLM-powered applications and agents. In this room, its most important concept is tool calling. A tool is a controlled function that gives the model access to an external capability, such as searching mock data, checking a trusted source, extracting keywords, or classifying a request.
A LangChain agent can decide when to request an approved tool, provide the required input, receive the result, and use that information to produce a final answer.
LangChain is a good fit when a workflow requires:
A model call
A small set of controlled tools
Simple tool selection
Clear tool inputs and outputs
A lightweight agent loop
For the early exercises in this room, LangChain introduces tool use without the additional complexity of a full graph-based workflow.
What Is LangGraph?
LangGraph(opens in new tab) is a framework for building stateful, graph-based agent workflows. Rather than treating the agent as a single loop, it represents the workflow as nodes and edges. Each node performs a specific step, state carries information between steps, edges define the execution path, and conditional edges allow the workflow to branch based on values stored in state.
LangGraph is a good fit when a workflow requires:
Explicit state
Multiple steps
Conditional routing
Retries or fallback paths
Human approval points
Longer or more complex orchestration
For the later exercises in this room, LangGraph makes the execution path visible, testable, and easier to debug.
Choosing the Right Approach
The right implementation depends on the workflow, not on whether the word “agent” sounds more advanced.
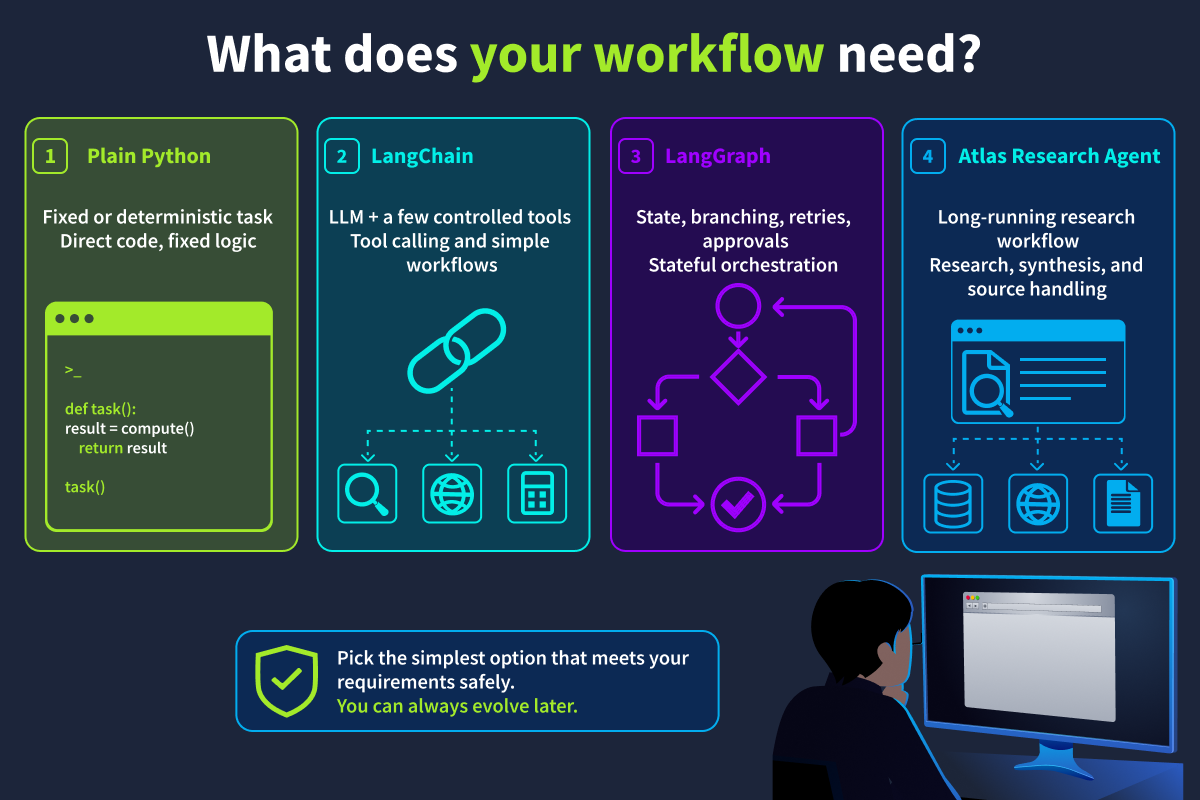
Use plain Python when the task is fixed, predictable, and mostly deterministic.
Use LangChain when the workflow needs an LLM plus a small number of controlled tools, but does not need complex state management or branching.
Use LangGraph when the workflow needs explicit state, conditional paths, retries, human approval points, or structured multi-step orchestration.
| Use case | Good fit |
|---|---|
| Fixed prompt and response flow | Plain Python |
| LLM with a few controlled tools | LangChain |
| Stateful workflow with routing or branching | LangGraph |
| Long-running research workflow with synthesis and source handling | Atlas Research Agent |
The purpose of this comparison is not to rank frameworks from simple to advanced. Each option fits a different engineering need.
A simple Python script is often the safest and easiest option when the workflow is predictable. LangChain is useful when a model needs access to controlled tools. LangGraph is better suited for workflows that need visible state, explicit routing, conditional branches, retries, or approval points.
An agent framework should be selected because the workflow needs it, not because the system uses an LLM.
Answer the questions below
What framework is useful when an LLM needs a few controlled tools? LangChain
What type of path does a basic LLM workflow follow? Fixed path
Basic Python LLM Workflow
Before building an agent, it is important to understand the simplest form of an LLM-powered workflow. A basic LLM workflow does not use tools, memory, branching, retries, or stateful orchestration. Instead, it follows a fixed path:
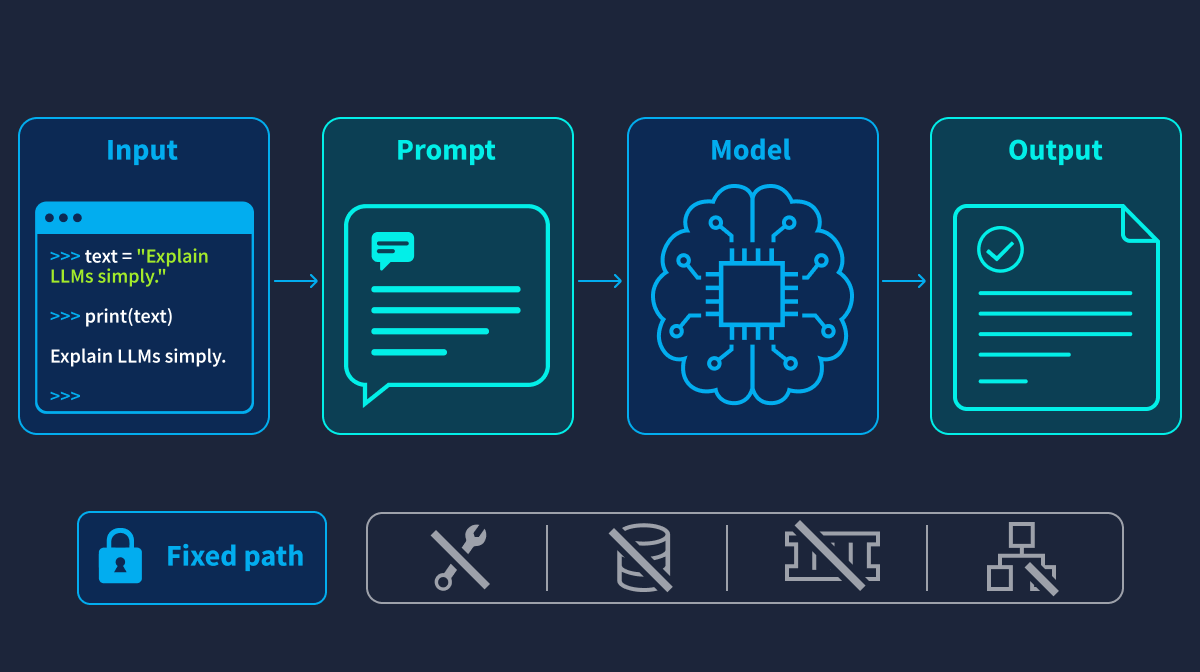
This approach is suitable when the task is predictable, and the system does not need to decide what to do next. In this task, you will run a basic Python script that loads a sample request, constructs a prompt, sends it to the model, and prints the response.
The goal is to understand the foundation on which more advanced workflows are built. LangChain and LangGraph introduce useful abstractions, but the underlying pattern remains the same: provide context to a model and handle its response.
Why Start with Plain Python?
Plain Python makes a workflow easier to inspect because it has fewer moving parts: no tools are called, no graph routes execution, and no state is passed between nodes. This makes it easier to understand:
What input the workflow receives
How the prompt is constructed
What the model returns
Where errors may occur
If a task requires only a single prompt and response, introducing a full agent framework may add unnecessary complexity.
On your machine, open a terminal and move into the lab directory:
Terminal
user@machine$ cd ~/agent-foundations
Working with TODOs
The lab files contain small TODO markers that indicate where you need to complete or modify the code. The surrounding code is already provided so you can focus on one concept at a time.
When you encounter a TODO, read the nearby comments first to understand what the missing code should do. After completing it, run the script from the project root and review the output to confirm that your changes work as expected.
In this room, you should only edit the files inside:
agent/
tools/
data/
The Script
Open the following file:
Terminal
user@machine$ cat agent/01_basic_llm_workflow.py
You’ll be able to see that the script performs four simple steps:
Load a sample request.
Build a prompt.
Send the prompt to the model.
Print and log the response.
This file has no TODO you need to address - it already runs end to end. The only corrections needed are to the example request/prompt and the claimed log output.
The sample request is loaded from data/sample_requests.json
Example request:
{
  "request_id": "REQ-001",
  "task": "Summarise the latest research on AI agent tool calling in two sentences.",
  "audience": "junior security analyst",
  "expected_route": "direct_answer"
}
The script uses this request to create a prompt similar to:
You are helping a security team understand an AI research assistant.Task: Summarise the purpose of an AI research assistant for security analysts.Audience: junior security analystWrite a clear and concise explanation.
The model should return a short response written for the specified audience.
Run the Workflow
From the project root, run:
Terminal
user@machine$ python3 agent/01_basic_llm_workflow.py
Review the output in the terminal, then check the log file logs/agent_foundations.log.
Each line is formatted as timestamp | LEVEL | logger name | message. You should see these messages, in order:
Loaded request REQ-001'Summarise the latest research on AI agent tool calling in two sentences.'Built prompt from request.Model response received.Workflow run completed.
Modify the Request
Open the data/sample_requests.json file:
Terminal
user@machine$ nano data/sample_requests.json
Find the request with request_id REQ-001 and change the audience from:
junior security analyst
To:
SOC manager
Run the script again:
Terminal
user@machine$ python3 agent/01_basic_llm_workflow.py
Then compare the new response with the previous one. The main topic should remain consistent, but the explanation should adapt to the new audience.
After completing this task, you should be able to explain how a basic Python LLM workflow operates and why it is not yet an agent. The workflow does not select tools, update state, branch between paths, retry failed steps, or decide what action to take next. Instead, it follows a fixed execution path from input to output.
Answer the questions below
Does this workflow use tools? (Yea/Nay) Nay
What changes the response style? Audience
Is this an agent? (Yea/Nay) Nay
Run the basic workflow after modifying the audience for REQ-001. What is the flag?
python3 agent/01_basic_llm_workflow.py
2026-08-25 09:18:14 | INFO     | config | Using the THM.
=== 01_basic_llm_workflow: Input -> Prompt -> Model -> Output ===
2026-08-25 09:18:14 | INFO     | 01_basic_llm_workflow | Loaded request REQ-001 for audience 'SOC manager' - 'Summarise the latest research on AI agent tool calling in two sentences.'
2026-08-25 09:18:14 | INFO     | 01_basic_llm_workflow | Built prompt from request.
2026-08-25 09:18:17 | INFO     | 01_basic_llm_workflow | Model response received.

Model response:
The latest research on AI agent tool calling highlights the ability of AI systems to autonomously invoke external tools and APIs, enhancing their operational capabilities in real-time decision-making. This advancement allows for more efficient incident response and threat detection by enabling agents to access and utilize relevant data and functionalities as needed.
2026-08-25 09:18:17 | INFO     | 01_basic_llm_workflow | Workflow run complete.
2026-08-25 09:18:17 | INFO     | 01_basic_llm_workflow | THM{basic_llm_workflow_REDACTED}

THM{basic_llm_workflow_REDACTED}
Tool Calling with LangChain
In the previous task, you ran a basic LLM workflow that followed a fixed path:
Input → Prompt → Model → Output
This approach is useful for predictable tasks, but it has an important limitation: the model can respond only using the context provided in the prompt and the knowledge available to it.
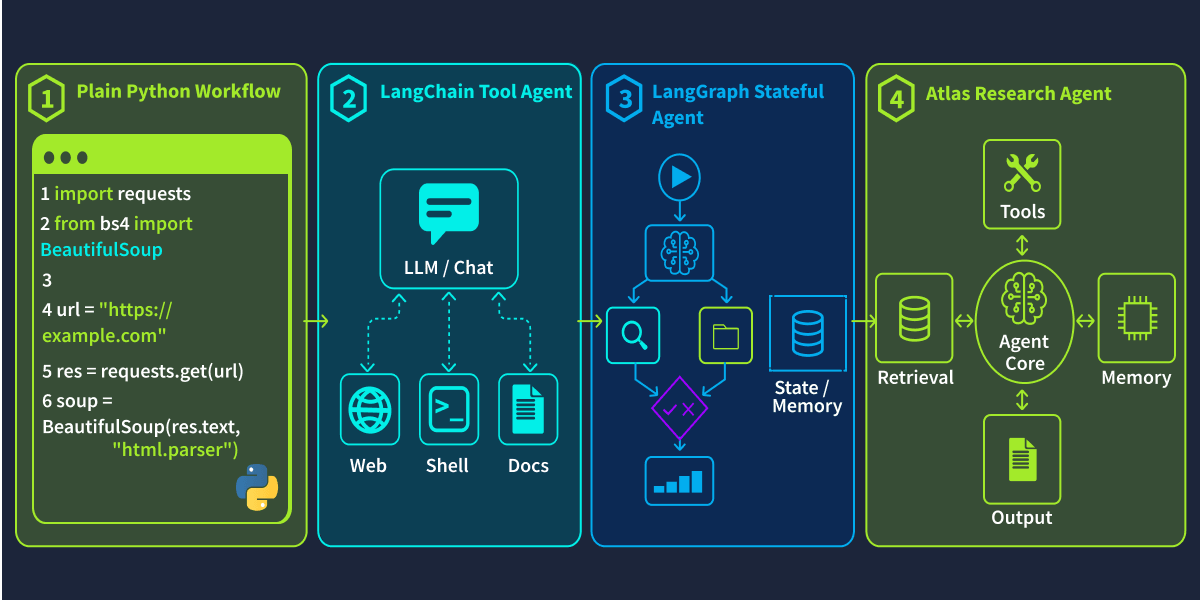
The image below compares a fixed LLM workflow with a small LangChain-style tool-calling agent. The key difference is that tool calling allows the model to request approved external capabilities instead of relying only on prompt context and model knowledge.
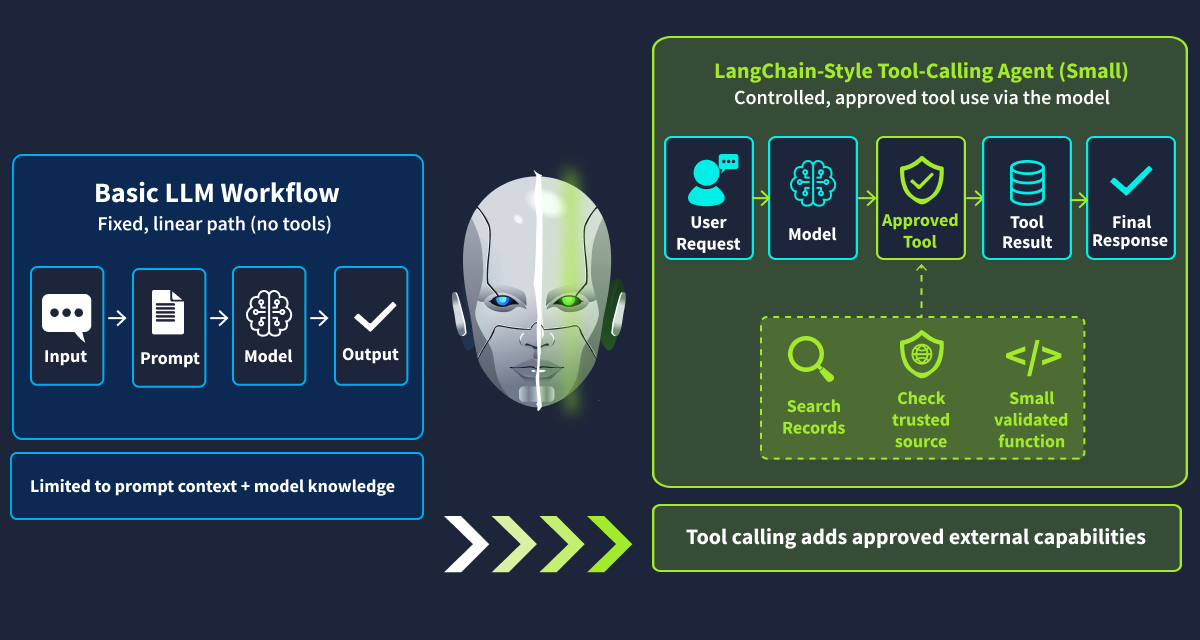
In this task, you will build a small LangChain tool-calling agent. Rather than creating the full Atlas Research Agent yet, you will focus on the core interaction between the user, the model, an approved tool, the tool result, and the final response.
Why Connect Tools to Data Sources?
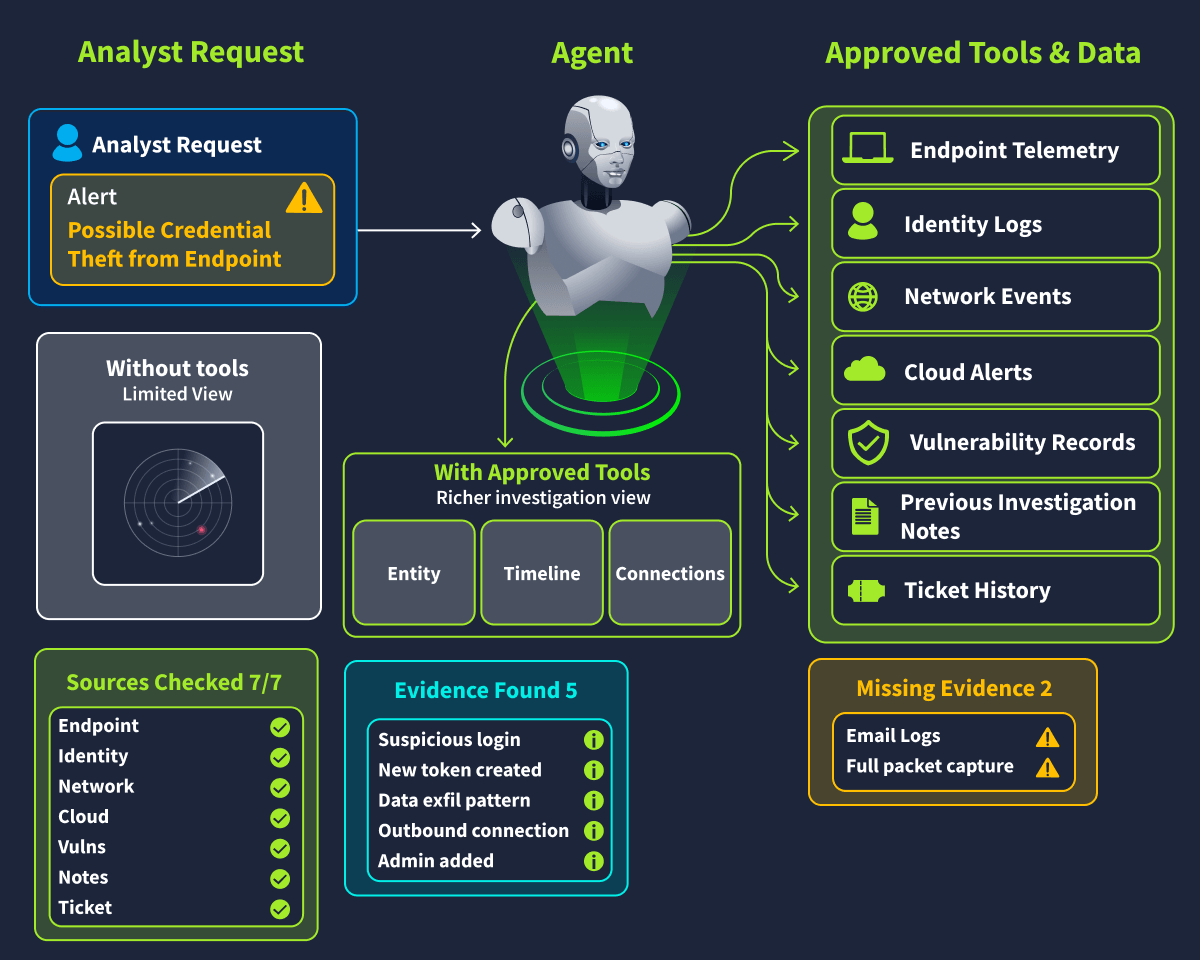
A model does not automatically know what is happening inside an environment. In security workflows, relevant evidence may be distributed across endpoint telemetry, identity logs, network events, cloud alerts, vulnerability records, previous investigation notes, and ticket history.
Each platform may provide strong visibility into one part of the environment without capturing the complete picture. For example, an endpoint tool may reveal process and device activity, while identity, network, cloud, or historical investigation context remains in other systems.
Tool calling helps bridge these gaps by connecting the workflow to approved data sources rather than forcing the model to rely on incomplete context or guess. In a well-designed agent, tools are therefore not merely additional capabilities; they are controlled windows into trusted data.
Why Use LangChain?
Tool calling can be implemented manually, but frameworks such as LangChain provide standard interfaces for connecting language models, prompts, and tools. LangChain is useful when an application needs a small set of controlled tools and a simple execution loop, allowing the model to request a tool, provide its arguments, receive the result, and continue the workflow.
However, LangChain does not make a system safe by default. The developer must still control which tools are available, validate inputs, handle errors, and restrict what each tool is allowed to do. The model may decide which approved tool to request, but the Python application remains responsible for validating and executing that request.
Defining Tools
On your machine, open the following file:
user@machine$ nano ~/agent-foundations/tools/source_tools.py
The file already has its imports, ALLOWED_SEVERITIES, the CVE_ID_PATTERN regex, and a mock SECURITY_RECORDS dict keyed by CVE ID. It also already has both tools stubbed out with their @tool decorator, docstring, and a TODO where the lookup logic goes:
@tool
def search_security_record(cve_id: str) -> dict:
    """
    Look up a single security record by its CVE identifier (e.g. 'CVE-2025-1001').

    Returns a dict with a "found" key. When found, also includes "cve_id",
    "title", "severity", and "description". When not found - including when
    cve_id isn't a validly formatted CVE identifier - includes an "error"
    key instead.
    """
    # TODO: validate `cve_id` against CVE_ID_PATTERN, then look it up in
    # SECURITY_RECORDS.
Fill in the TODO:
@tool
def search_security_record(cve_id: str) -> dict:
    """
    Look up a single security record by its CVE identifier (e.g. 'CVE-2025-1001').

    Returns a dict with a "found" key. When found, also includes "cve_id",
    "title", "severity", and "description". When not found - including when
    cve_id isn't a validly formatted CVE identifier - includes an "error"
    key instead.
    """
    if not isinstance(cve_id, str) or not CVE_ID_PATTERN.match(cve_id.strip()):
        return {
            "found": False,
            "cve_id": str(cve_id),
            "error": "Invalid CVE identifier format. Expected 'CVE-YYYY-NNNN'.",
        }

    normalized = cve_id.strip().upper()
    record = SECURITY_RECORDS.get(normalized)
    if record is None:
        return {
            "found": False,
            "cve_id": normalized,
            "error": "No security record found for this CVE identifier.",
        }

    return {"found": True, "cve_id": normalized, **record}
Do the same for the second tool:
@tool
def list_security_records(severity: Literal["critical", "high", "medium", "low"]) -> dict:
    """
    List security records filtered by severity.

    Args:
        severity: One of 'critical', 'high', 'medium', 'low'.

    Returns:
        {"severity_filter": str, "count": int,
         "records": [{"cve_id": str, "title": str, "severity": str}, ...]}
    """
    if severity not in ALLOWED_SEVERITIES:
        return {
            "severity_filter": str(severity),
            "count": 0,
            "records": [],
            "error": f"severity must be one of {ALLOWED_SEVERITIES}.",
        }

    records = [
        {"cve_id": cve_id, "title": data["title"], "severity": data["severity"]}
        for cve_id, data in SECURITY_RECORDS.items()
        if data["severity"] == severity
    ]

    return {"severity_filter": severity, "count": len(records), "records": records}
The @tool decorator converts each Python function into a LangChain tool. The function name, docstring, and type annotations describe the tool to the model, helping it determine when the tool should be used and which arguments it requires. Each tool returns a structured dictionary rather than free-form text, making the result easier to inspect, validate, and reuse throughout the workflow. Both tools validate their input against SECURITY_RECORDS/ALLOWED_SEVERITIES before doing anything else - never trust that the model's argument is well-formed.
Building the Agent Open the agent file:
user@machine$ nano agent/02_langchain_tool_agent.py
Add the required import:
from langchain.agents import create_agent
The model and the approved tool set are already defined:
model = get_model(supports_tools=True)
tools = [search_security_record, list_security_records]
The model and the approved tool set are already defined:
model = get_model(supports_tools=True)
tools = [search_security_record, list_security_records]
Now replace the agent = None placeholder with a real agent:
agent = create_agent(
    model=model,
    tools=tools,
    system_prompt=(
        "You are a security research assistant. "
        "Use only the provided tools to retrieve security records. "
        "Do not invent records or tool results. "
        "Clearly state when a record cannot be found."
    ),
)
The system prompt defines the agent's role and boundaries. It instructs the model to rely on approved tools instead of inventing security records. run_agent() is already implemented - it invokes the agent with the user's request and returns the content of the final message:
def run_agent(user_request: str) -> str:
    """
    Invoke the agent with a single user message and return the final
    assistant message's content.
    """
    if agent is None:
        # Safe placeholder: lets this script run before the agent above is built.
        logger.info("run_agent() is using the placeholder implementation (agent is None).")
        return "TODO: run_agent() is not implemented yet."

    result = agent.invoke({"messages": [{"role": "user", "content": user_request}]})
    return result["messages"][-1].content
Once agent is a real create_agent(...) object instead of None, the placeholder branch above never runs.
The entry point is also already written, and prints the flag once the agent's response actually mentions the CVE it was asked about:
if __name__ == "__main__":
    print("=== 02_langchain_tool_agent ===")

    response = run_agent("Find the security record for CVE-2025-1001.")
    print(response)

    if agent is not None and "TODO" not in response and "CVE-2025-1001" in response:
        flag = get_flag("langchain_tool_agent_working")
        logger.info(flag)
        print(f"\n{flag}")
    else:
        print("\nThe agent isn't fully working yet - no flag.")
Run the Agent
user@machine$ python3 agent/02_langchain_tool_agent.py
The agent should use the approved tool to retrieve the record for CVE-2025-1001, produce a short response based on the tool result, and print the flag.
Now temporarily change the request passed to run_agent() in the entry point in 02_langchain_tool_agent.py to:
response = run_agent("Find the security record for 1001.")
Run the script again:
user@machine$ python3 agent/02_langchain_tool_agent.py
search_security_record should reject "1001" as an invalid CVE format and the agent should report that no record could be found, rather than fabricating one - "CVE-2025-1001" won't appear in the response, so the flag won't print for this run. That's expected: it demonstrates that the tool doesn't blindly trust the model's argument, but validates the input before processing it and returning a result.
Change the request back to:
response = run_agent("Find the security record for CVE-2025-1001.")
Before moving on, so the script prints the flag again.
Answer the questions below
What decorator converts a Python function into a LangChain tool? @tool
Modify then run the LangChain tool script. What is the flag THM{langchain_tool_agent_REDACTED}
nano agent/02_langchain_tool_agent.py

ubuntu@tryhackme:~/agent-foundations$ python3 agent/02_langchain_tool_agent.py
2026-08-26 13:12:51 | INFO     | config | Using the THM.
=== 02_langchain_tool_agent ===
CVE-2025-1001 (critical severity): Remote code execution in mock-http-server via crafted header. A crafted request header allows an unauthenticated attacker to trigger remote code execution on affected mock-http-server deployments prior to version 2.3.1.
2026-08-26 13:12:51 | INFO     | 02_langchain_tool_agent | THM{langchain_tool_agent_REDACTED}

THM{langchain_tool_agent_REDACTED}
Structured Outputs
In the previous task, the LangChain agent returned a natural-language response. Although this format is useful for humans, it can be difficult for software to validate, test, or reuse. Agent workflows often require predictable, structured outputs so that other parts of the application can reliably extract information such as:
Was a tool needed?
What risk level was assigned?
What should happen next?
Was the answer valid?
If the model returns a free-form paragraph, important details may be missing, inconsistent, or difficult for software to parse. Structured outputs address this problem by requiring the response to follow a defined schema.
Instead of returning only text, the workflow can produce fields such as:
request_idsummaryrisk_level
This makes the output easier to validate, log, test, reuse, and pass to the next step in the workflow.
Why Structured Outputs Matter
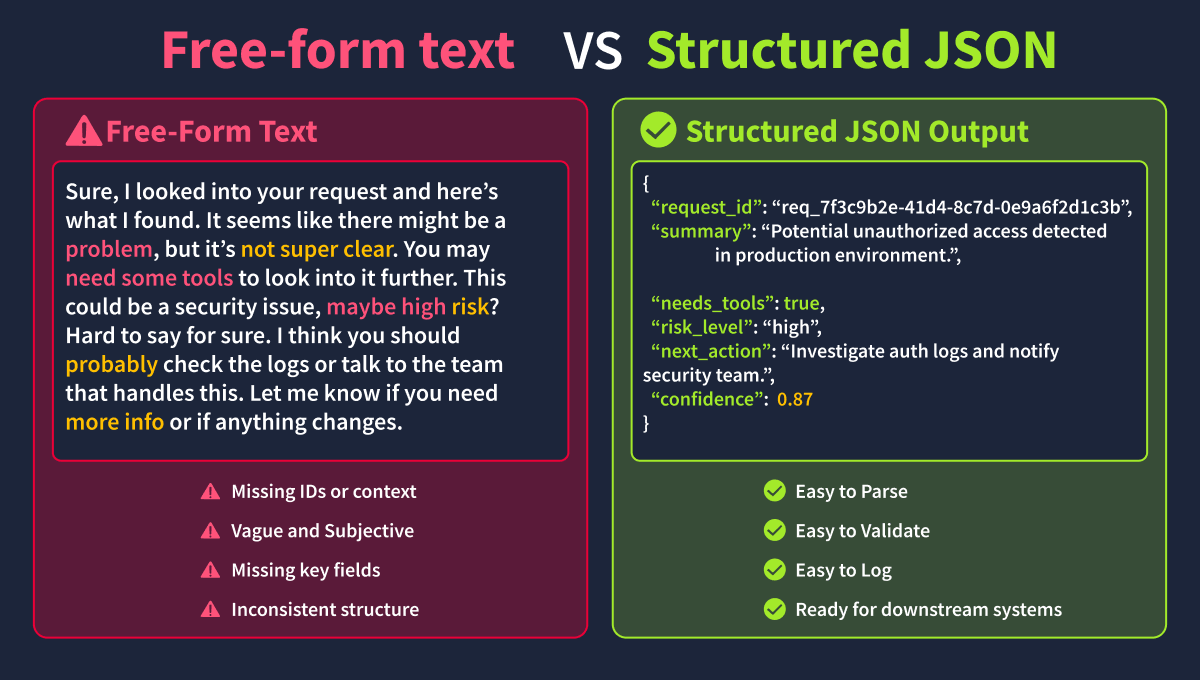
Free-form model responses are flexible, but that flexibility can create ambiguity. For example, a model might return:
This request looks important. I think the analyst should review it soon.
Although the response sounds reasonable, it does not clearly indicate the assigned risk level, whether a tool was required, or what action should happen next.
A structured output is clearer:
{
 "request_id": "REQ-003",
 "summary": "The request asks for a security record review.",
 "needs_tools": true,
 "risk_level": "medium",
 "next_action": "retrieve_security_record",
 "confidence": 0.78
}
The second response is easier to check because each field has a specific purpose.
The Script
On your machine, open the following file:
user@machine$ nano agent/03_structured_outputs.py
This script already defines the output contract for you: a StructuredResponse Pydantic model with request_id, summary, needs_tools, risk_level, next_action, and confidence fields, plus validators that reject anything outside the allowed values:
ALLOWED_RISK_LEVELS = ["low", "medium", "high"]
ALLOWED_NEXT_ACTIONS = [
    "answer_directly",
    "retrieve_sources",
    "request_human_review",
    "reject_request",
]

class StructuredResponse(BaseModel):
    """The schema every structured agent response must satisfy."""

    request_id: str
    summary: str
    needs_tools: bool
    risk_level: str
    next_action: str
    confidence: float

    @field_validator("risk_level")
    @classmethod
    def validate_risk_level(cls, value: str) -> str:
        if value not in ALLOWED_RISK_LEVELS:
            raise ValueError(f"risk_level must be one of {ALLOWED_RISK_LEVELS}, got {value!r}")
        return value

    @field_validator("next_action")
    @classmethod
    def validate_next_action(cls, value: str) -> str:
        if value not in ALLOWED_NEXT_ACTIONS:
            raise ValueError(f"next_action must be one of {ALLOWED_NEXT_ACTIONS}, got {value!r}")
        return value

    @field_validator("confidence")
    @classmethod
    def validate_confidence(cls, value: float) -> float:
        if not (0.0 <= value <= 1.0):
            raise ValueError(f"confidence must be between 0.0 and 1.0, got {value!r}")
        return value
Restricting risk_level and next_action to a fixed set of values makes invalid or inconsistent model output easy to catch before anything downstream trusts it.
Filling In the Classification Logic
The schema is already in place - your job is the TODO inside generate_structured_response().
This function currently builds a placeholder candidate that always reports low risk and answer_directly, regardless of the actual request. Replace the placeholder with logic that calls the shared classify_request_type() helper (from agent/config.py) and maps its result to risk_level, next_action, and needs_tools:
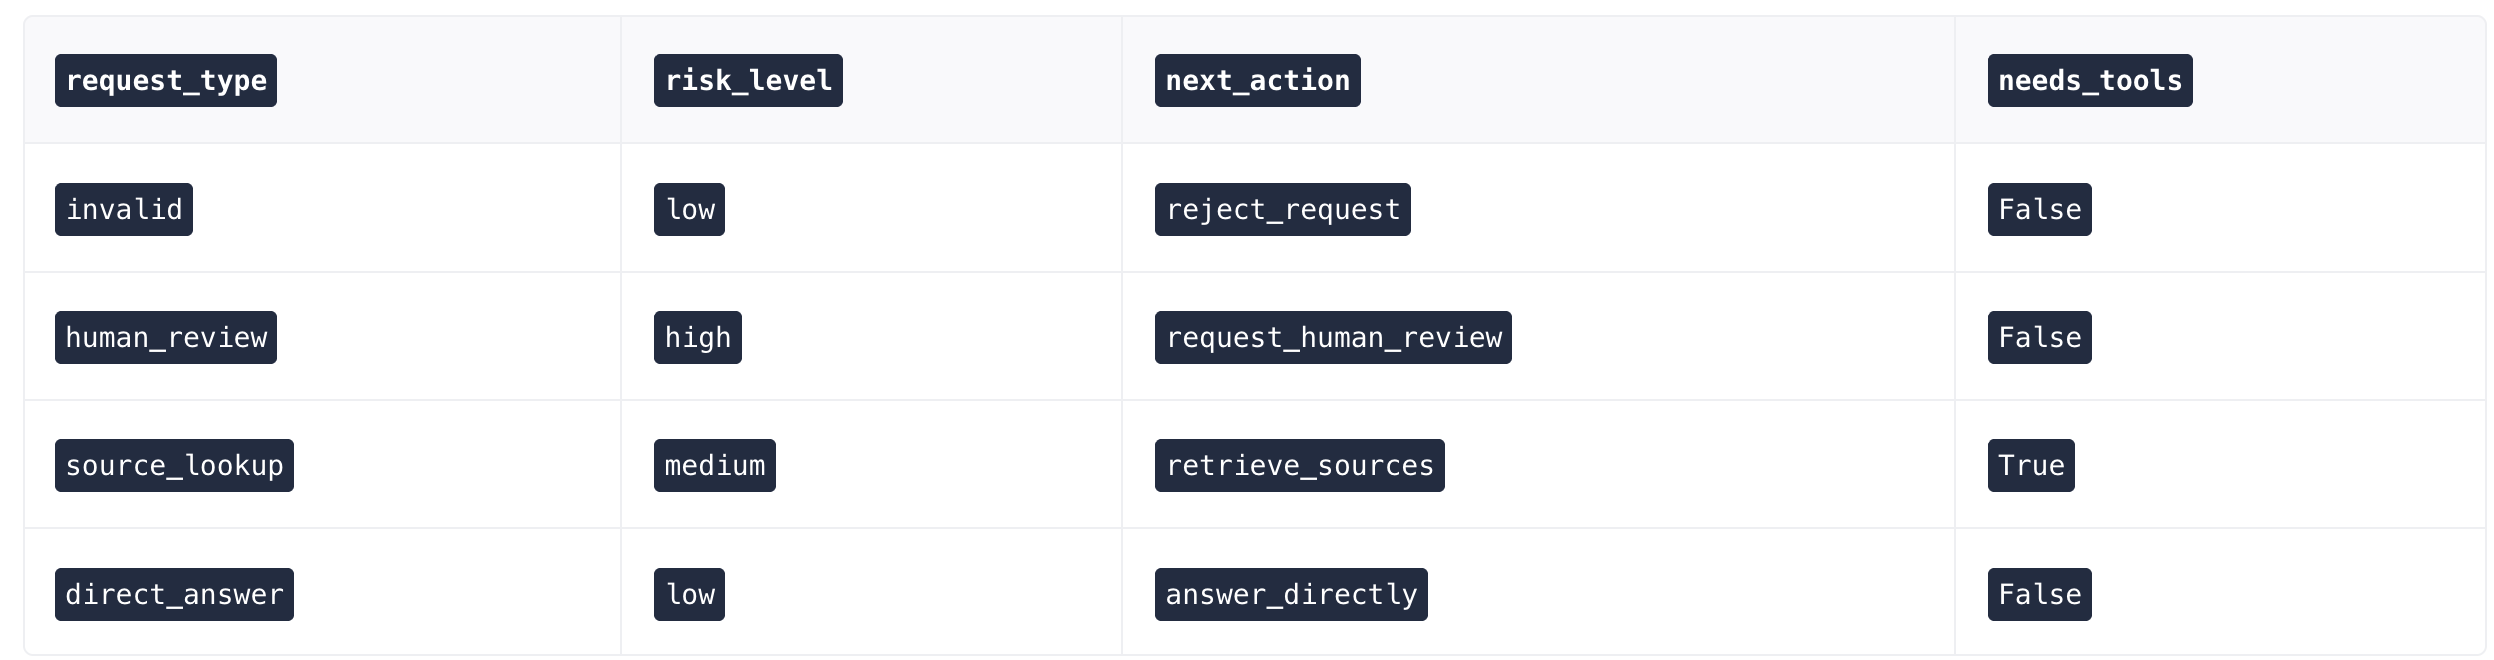
confidence should follow {"low": 0.9, "medium": 0.75, "high": 0.55}[risk_level].
def generate_structured_response(request: dict) -> dict:
    """Build a candidate structured response from a classification + model summary."""
    task_text = request.get("task", "")

    model = get_model()
    model_summary = model.invoke(f"Summarise this request for a structured report: {task_text}").content
    logger.info("Model produced a raw summary for the structured response.")

    classification = classify_request_type(task_text)
    request_type = classification["request_type"]

    if request_type == "invalid":
        risk_level, next_action, needs_tools = "low", "reject_request", False
    elif request_type == "human_review":
        risk_level, next_action, needs_tools = "high", "request_human_review", False
    elif request_type == "source_lookup":
        risk_level, next_action, needs_tools = "medium", "retrieve_sources", True
    else:  # direct_answer
        risk_level, next_action, needs_tools = "low", "answer_directly", False

    confidence = {"low": 0.9, "medium": 0.75, "high": 0.55}[risk_level]

    candidate = {
        "request_id": request["request_id"],
        "summary": model_summary,
        "needs_tools": needs_tools,
        "risk_level": risk_level,
        "next_action": next_action,
        "confidence": confidence,
    }
    logger.info(f"Structured candidate built for {request['request_id']}: {candidate}")
    return candidate
The rest of the file (load_sample_request, validate_structured_response, and the __main__ block) is already complete - it validates your candidate against StructuredResponse and prints the flag once generate_structured_response() correctly classifies the sample request (REQ-002, a source-lookup request) as next_action="retrieve_sources", needs_tools=True, risk_level="medium".
Run the Script
The entry point at the bottom of the file is already written for you - you don't need to add one:
if __name__ == "__main__":
    print("=== 03_structured_outputs: generate -> validate -> emit structured JSON ===")

    sample_request = load_sample_request("REQ-002")
    candidate_response = generate_structured_response(sample_request)

    validated_response = validate_structured_response(candidate_response)

    print("\nValidated structured output:")
    print(json.dumps(validated_response.model_dump(), indent=2))

    if (
        validated_response.next_action == "retrieve_sources"
        and validated_response.needs_tools is True
        and validated_response.risk_level == "medium"
    ):
        flag = get_flag("structured_outputs_validated")
        logger.info(flag)
        print(f"\n{flag}")
    else:
        print("\ngenerate_structured_response() isn't using classify_request_type() yet - no flag.")
Run it:
user@machine$ python3 agent/03_structured_outputs.py
Once your mapping is in place, you should see a JSON response that follows the StructuredResponse schema for REQ-002 (a source-lookup request), and the flag printed.
Test the Validation
Now break it on purpose. In generate_structured_response(), temporarily change the source_lookup branch from:
elif request_type == "source_lookup": risk_level, next_action, needs_tools = "medium", "retrieve_sources", True
To:
elif request_type == "source_lookup": risk_level, next_action, needs_tools = "critical", "retrieve_sources", True
Run the script again:
Terminal user@machine$ python3 agent/03_structured_outputs.py
validate_structured_response() should raise a ValidationError, because "critical" is not one of ALLOWED_RISK_LEVELS. This demonstrates how the schema's validators catch an invalid value before anything downstream trusts it.
elif request_type == "source_lookup": risk_level, next_action, needs_tools = "medium", "retrieve_sources", True
Answer the questions below
What Pydantic model validates the structured output? StructuredResponse
State with LangGraph
In the previous tasks, the workflow either followed a fixed path or returned a structured decision. Real agent workflows, however, often need to preserve information across multiple steps, such as the original request, its type, whether a tool was used, whether an error occurred, and the final answer.
This tracked information is called state. By carrying a structured object through the workflow instead of passing loose values between functions, state makes each step easier to inspect, test, and debug.
In this task, you will use LangGraph to build a small stateful workflow that follows this path:
START → load_request → classify_request → generate_answer → END
Each node will read from the current state, update the relevant fields, and return only the fields it changed - LangGraph merges that into the shared state before handing it to the next node.
Why State Matters
A basic Python workflow can pass values directly between functions, which works well for small scripts. As workflows become more agentic, however, they often need to track additional information:
What was the original request?
What type of request is it?
Were tools required?
Did any step fail?
What answer was generated?
State provides a shared structure for storing and updating information throughout the workflow. Because each step records what it changed, a stateful workflow is easier to inspect and debug, especially before introducing branching, retries, or human approval points.
This becomes even more important when the workflow connects to multiple data sources. If an agent checks endpoint telemetry, identity logs, vulnerability records, and previous notes, it should track which sources were queried, what each source returned, and which evidence is still missing. Without this shared state, it becomes much harder to explain how the agent reached its conclusion.
The Script
Open the following file:
Terminal
user@machine$ nano agent/04_langgraph_state.py
The state schema is already defined for you:
class AgentState(TypedDict):
    """The shared state object every node in the graph reads and updates."""

    request_id: str
    user_request: str
    request_type: str
    tool_results: list
    errors: list
    final_answer: str
AgentState defines the fields that move through the graph:
request_iduser_requestrequest_typetool_resultserrorsfinal_answer
The Nodes That Are Already Wired
A LangGraph node is a function that receives the current state and returns a dict of the fields it wants to update - it doesn't need to return the whole state back.
Three of the four nodes are already implemented for you:
def load_request(state: AgentState) -> dict:
    """Node 1: populate request_id and user_request from sample data."""
    with open(SAMPLE_REQUESTS_PATH, "r", encoding="utf-8") as f:
        requests = json.load(f)

    request = requests[0]
    logger.info(f"[load_request] Loaded {request['request_id']}.")

    return {
        "request_id": request["request_id"],
        "user_request": request["task"],
    }


def classify_request(state: AgentState) -> dict:
    """Node 2: classify the request and record the result in tool_results."""
    classification = classify_request_type(state["user_request"])
    logger.info(f"[classify_request] request_type={classification['request_type']}")

    updated_tool_results = state["tool_results"] + [
        {"tool": "classify_request_type", "result": classification}
    ]

    return {
        "request_type": classification["request_type"],
        "tool_results": updated_tool_results,
    }


def log_summary(state: AgentState) -> dict:
    """Node 3: log a summary of state so far. No state changes needed."""
    logger.info(
        f"[log_summary] request_id={state['request_id']} "
        f"request_type={state['request_type']} "
        f"tool_calls_so_far={len(state['tool_results'])}"
    )
    return {}
load_request reads the first sample request from data/sample_requests.json. classify_request uses classify_request_type() from agent/config.py, the same helper introduced in the previous task. It also records the call in tool_results so the state shows which "tools" ran. log_summary doesn't change any state - it just logs where the workflow is so far.
Finishing the Fourth
Node Your first job is the TODO in generate_answer(). Right now, the function returns a placeholder string.
Replace it with logic that uses state["request_type"] and state["user_request"] to build a prompt, then calls the model.
def generate_answer(state: AgentState) -> dict:
    """Node 4: call the model to produce the final answer."""
    prompt = (
        f"Summarise this {state['request_type']} request in one sentence: "
        f"{state['user_request']}"
    )
    answer = get_model().invoke(prompt).content
    logger.info("[generate_answer] Final answer generated.")

    return {"final_answer": answer}
Building the Graph
Your second job is the TODO in build_graph(). It currently only registers load_request and wires it straight to END as a safe placeholder. Register the other three nodes and connect all five edges:
def build_graph() -> StateGraph:
    """Wire the nodes together into the START -> ... -> END graph."""
    graph = StateGraph(AgentState)

    graph.add_node("load_request", load_request)
    graph.add_node("classify_request", classify_request)
    graph.add_node("log_summary", log_summary)
    graph.add_node("generate_answer", generate_answer)

    graph.add_edge(START, "load_request")
    graph.add_edge("load_request", "classify_request")
    graph.add_edge("classify_request", "log_summary")
    graph.add_edge("log_summary", "generate_answer")
    graph.add_edge("generate_answer", END)

    return graph.compile()
This defines the execution path: the graph starts, loads the request, classifies it, logs a summary, generates an answer, and ends.
Run the Workflow
The entry point at the bottom of the file is already written for you:
if __name__ == "__main__":
    print("=== 04_langgraph_state: START -> load_request -> classify_request -> log_summary -> generate_answer -> END ===")

    compiled_graph = build_graph()

    initial_state: AgentState = {
        "request_id": "",
        "user_request": "",
        "request_type": "",
        "tool_results": [],
        "errors": [],
        "final_answer": "",
    }

    final_state = compiled_graph.invoke(initial_state)

    print("\nFinal state:")
    print(json.dumps(final_state, indent=2))

    logger.info("LangGraph run complete.")

    if (
        final_state["request_type"]
        and final_state["final_answer"]
        and "TODO" not in final_state["final_answer"]
    ):
        flag = get_flag("langgraph_nodes_connected")
        logger.info(flag)
        print(f"\n{flag}")
    else:
        print("\nThe graph isn't fully wired yet (build_graph()/generate_answer()) - no flag.")
Run it:
user@machine$ python3 agent/04_langgraph_state.py
The final state should be printed in the terminal, along with the flag once both TODO are done. Notice that the workflow returns more than an answer: it also exposes the information carried and updated throughout the graph (request_type, tool_results, and so on).
Answer the questions below
What class defines the workflow state? AgentState
Branching, Routing, and Framework Decision
In the previous task, you used LangGraph state to carry information through a fixed workflow:
START → load_request → classify_request → generate_answer → END
This approach is useful, but many agent workflows need to choose different paths depending on the request. A simple question may require a direct answer, a CVE-related request may need a source lookup, and an unsafe or unsupported request may need to be rejected.
This is where branching and routing become useful. Branching allows the workflow to select the next node based on values stored in state, so each request can follow the path that matches its needs.
In this task, you will complete a LangGraph workflow with conditional routing. Every request begins at classify_request and then passes through route_request, which sends it to exactly one of four branches: direct_answer, retrieve_sources, needs_human_review, or reject_invalid_request. After the selected branch completes, the workflow rejoins at a shared finalize node before reaching the end of the graph.
The request follows one of four branches: direct_answer, retrieve_sources, needs_human_review, or reject_invalid_request. All four rejoin at a common finalize node before the graph ends.
The workflow stores important fields in state - request_type, route, tool_results, errors, final_answer - and route_request uses request_type to decide which of the four branches to take. This is why state becomes especially useful once workflows start branching: it gives the graph a visible record of what happened and why a route was selected.
State with langgraph
This is why state becomes especially useful when workflows start branching. It gives the graph a visible record of what happened and why a route was selected.
Why Branching Matters
A basic workflow is easy to understand because every request follows the same path. Security and research workflows, however, often require different behaviour depending on the request, such as answering directly, retrieving evidence, stopping safely, or rejecting something outside the workflow’s scope.
Branching makes this decision explicit. Rather than hiding routing logic inside a long prompt, the workflow stores the request type in state and uses that value to select the next step. This makes the execution path easier to inspect, test, and debug.
The Script
Open the following file:
user@machine$ nano agent/05_langgraph_branching.py
The state and the routing table are already defined for you:
ALLOWED_ROUTES = [
    "direct_answer",
    "retrieve_sources",
    "needs_human_review",
    "reject_invalid_request",
]

# Maps classify_request_type()'s request_type onto this graph's branch names.
_ROUTE_BY_REQUEST_TYPE = {
    "direct_answer": "direct_answer",
    "source_lookup": "retrieve_sources",
    "human_review": "needs_human_review",
    "invalid": "reject_invalid_request",
}


class BranchingState(TypedDict):
    request_id: str
    user_request: str
    request_type: str
    route: str
    tool_results: list
    errors: list
    final_answer: str
request_type is the value the request classifier assigns; route is the branch name route_request decides on. _ROUTE_BY_REQUEST_TYPE is the table that connects the two.
The Nodes That Are Already Wired
classify_request is already implemented - it reuses the same classify_request_type() helper from agent/config.py you've used in the last two tasks, and records the call in tool_results:
def classify_request(state: BranchingState) -> dict:
    """Classify the request so route_request has something to branch on."""
    classification = classify_request_type(state["user_request"])
    logger.info(f"[classify_request] request_type={classification['request_type']}")
    return {
        "request_type": classification["request_type"],
        "tool_results": state["tool_results"] + [
            {"tool": "classify_request_type", "result": classification}
        ],
    }
All four branch nodes, and the finalize node they all rejoin at, are also already implemented:
def direct_answer(state: BranchingState) -> dict:
    """Branch: answer simple requests directly with the model."""
    prompt = f"Answer this request directly: {state['user_request']}"
    answer = get_model().invoke(prompt).content
    logger.info("[direct_answer] Answered directly, no source retrieval needed.")
    return {"final_answer": answer}


def retrieve_sources(state: BranchingState) -> dict:
    """Branch: retrieve security records before answering."""
    records = list_security_records.invoke({"severity": "critical"})
    logger.info(f"[retrieve_sources] Retrieved {records['count']} critical record(s).")

    answer = f"Found {records['count']} critical security record(s) to cite in this answer."
    return {
        "final_answer": answer,
        "tool_results": state["tool_results"] + [
            {"tool": "list_security_records", "result": records}
        ],
    }


def needs_human_review(state: BranchingState) -> dict:
    """Branch: stop and flag the request for a human instead of answering."""
    logger.info("[needs_human_review] Request flagged for human review; no automatic answer given.")
    return {
        "final_answer": "This request requires human review before the agent can proceed.",
    }


def reject_invalid_request(state: BranchingState) -> dict:
    """Branch: reject requests that are empty or otherwise invalid."""
    logger.warning("[reject_invalid_request] Request rejected as invalid.")
    return {
        "final_answer": "This request could not be processed - it was empty or invalid.",
        "errors": state["errors"] + ["invalid_request"],
    }


def finalize(state: BranchingState) -> dict:
    """Common exit node: log the final outcome for every branch."""
    logger.info(f"[finalize] route={state['route']} final_answer={state['final_answer']!r}")
    return {}
Notice retrieve_sources calls the real list_security_records tool from tools/source_tools.py - the same tool file you completed earlier in this room - instead of a hardcoded answer. This is also where needs_human_review comes in: it's a fourth branch that stops the workflow and asks for a human instead of generating an answer, for requests classify_request_type() flags as human_review.
The conditional-edge selector is already implemented too:
def select_branch(state: BranchingState) -> str:
    """Conditional-edge function: reads state['route'] and returns the next node name."""
    route = state["route"]
    if route not in ALLOWED_ROUTES:
        logger.warning(f"[select_branch] Unknown route {route!r}; defaulting to reject_invalid_request.")
        return "reject_invalid_request"
    return route